Hot List Management
Enter Hot Plate Information
To add Hot Plate, go to .
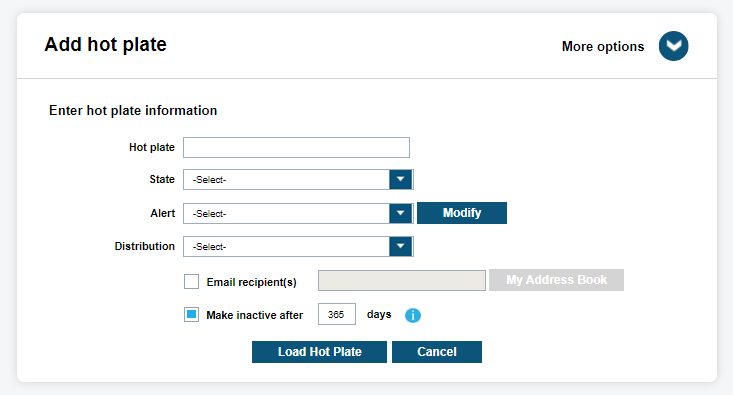
Site managers can add a single hot-plate to select users or Site-Wide. ClientPortal has three mandatory fields when entering a hot-plate:
- Hot Plate
- State
- Alert
The site manager is able to add/modify Alerts as needed. There are three options when assigning a Distribution of a Hot Plate to a Hot List data pool. First, Client Portal is able to assign to All Site Users. This option will add to the Site-Wide Hot List data pool. The second option is to distribute to Select Users. This option will pull up a secondary dialog box to select individual users to receive the Hot Plate. The last option is Only Email Recipient(s), which allows the ability to only assign the Hot List to specified email addresses. Currently this distribution method is only available for the single Add Hot Plate feature.
More Options
At this point, the site manager can select Load Hot Plate to upload the plate, or they can select More Options to assign further detail to the Hot Plate records. Within More Options, the site manager will have opportunity to select Assign Alert Levels for a specific record. This option will alert the Vigilant CarDetector user of the severity of the alert. When configured in Vigilant CarDetector, an Audio Alert will notify you of the severity as well as display the following color coded level for the Alert:
- Low-Yellow
- Medium-Orange
- High-Red
When adding a Hot Plate, ClientPortal has the option to make the record expire after a given period by selecting the Make Inactive after option. After a specified number of days, the record will become inactive but not be deleted. This allows for the record to become active again later. Also, there is the option to create hits from previous detections. When selecting Generate historical hits for last, Client Portal can enter a specific amount of time to do historical hit look-ups. Essentially, this allows for the creation of hits of detections that are already on the system. This option can sometimes be useful for forensic data look-ups. ClientPortal also has the option to enter the Order Date and the dialog box pops-up giving us the option to select a date. When not entered, it will be defaulted to the Date of Load.
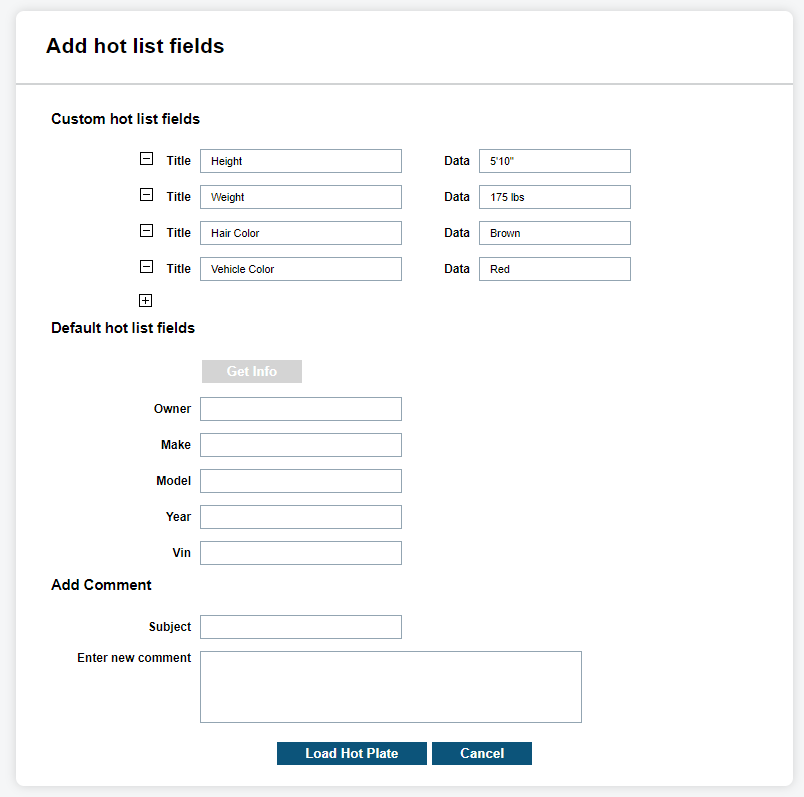
ClientPortal can also add customized note fields into ClientPortal in the Custom Hot List Fields section. ClientPortal is now able to select up to six customized note fields. Select the + symbol to enter a new Title and corresponding Data point. To remove a field, simply select the - symbol. These note fields will be seen in reports and attached to hit notices. Refer the following figure for example:
ClientPortal has the option to include details in the Default Hot List Fields section that describe the vehicle. For default fields, ClientPortal includes the following title:
- Vehicle Owner
- Vehicle Make
- Vehicle Model
- Vehicle Year
- Vehicle VIN
Lastly, ClientPortal can add comment about the Hot Plate being uploaded. To append a comment to the record, any user can type in the Enter Subject and Enter New Comment boxes. This dynamic comment field can be entered after the record has been uploaded. Thus, a trail of comments can be attached to a record. When all the above fields desired are complete, the site manager will selectLoad Hot Plate to finish the Hot Plate Upload. You will receive a confirmation that the plate has been loaded or a warning if a required field is missing.
Upload a Hot List File
To manually upload Hot List, go to .
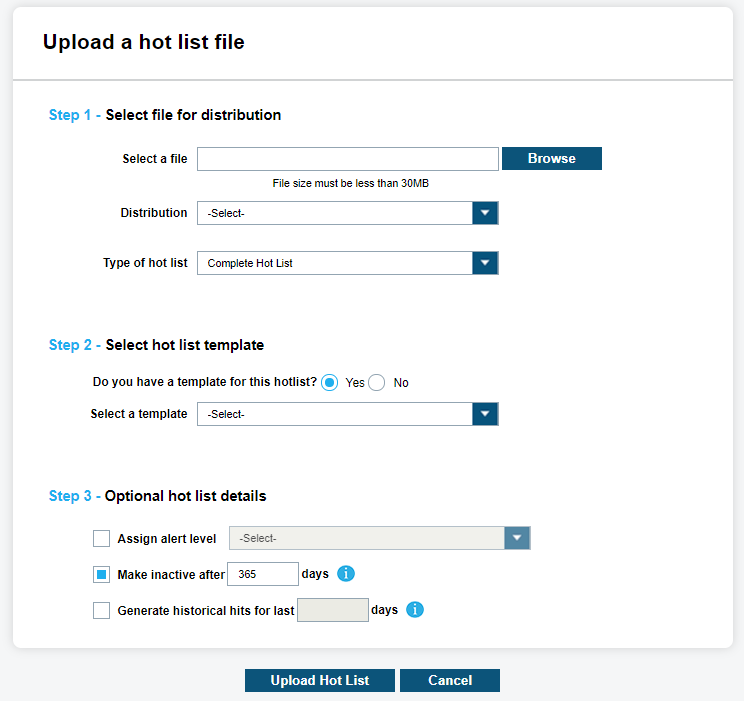
Select File For Distribution
This list consists of numerous Hot Plate records and is usually supplied by a local or regional government agency. First, the site manager will want to Select a File for the Hot List desired. Using the Browse button you will navigate to the file. It will display a shortened path to the Hot List. The file must be less than 30 MB in size to upload. If it is larger than 30 MB, please contact Vigilant Support and request assistance splitting the file. Next, the site manager will select the Distribution to assign to a specific Hot List pool. With the first option, ClientPortal is able to assign to All Site users. This option will add the Hot List to the Site-Wide Hot List data pool. The second option is to distribute to Select Users. This option will pull up a secondary dialog box to select individual users to receive the Hot Plate.
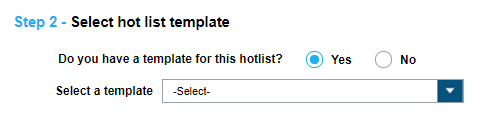
Select Hot List Template
Select Hot List Template
Before loading a Hot List, you must select a corresponding template. Once ClientPortal confirms that a template exists, you can select it from the Select a Template option. Simply select the desired template and choose Next. If the template is already being used by a different Auto Hot List or by a Shared Hot List, you will not see the template option. Only a single unique Template Source name can be assigned to an Site at any given time.
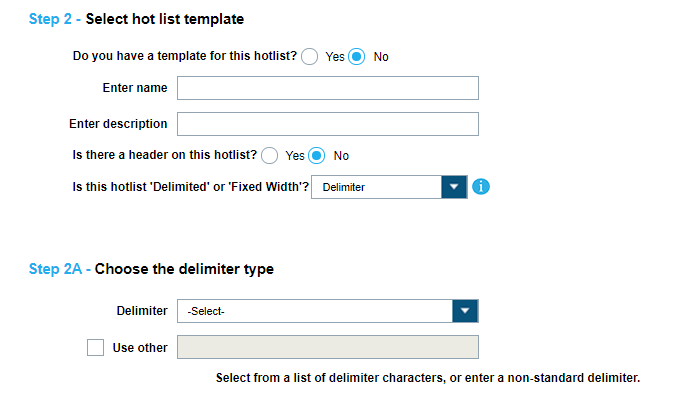
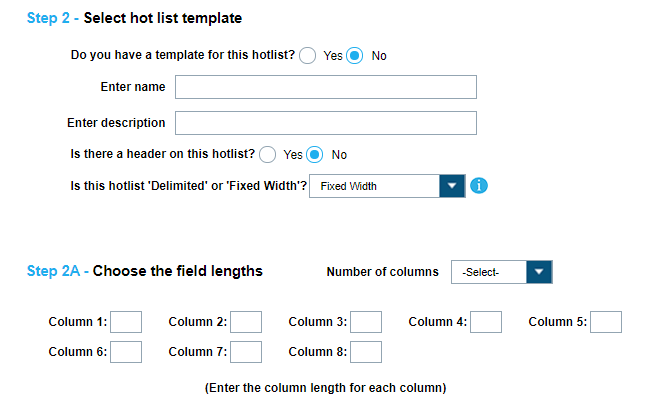
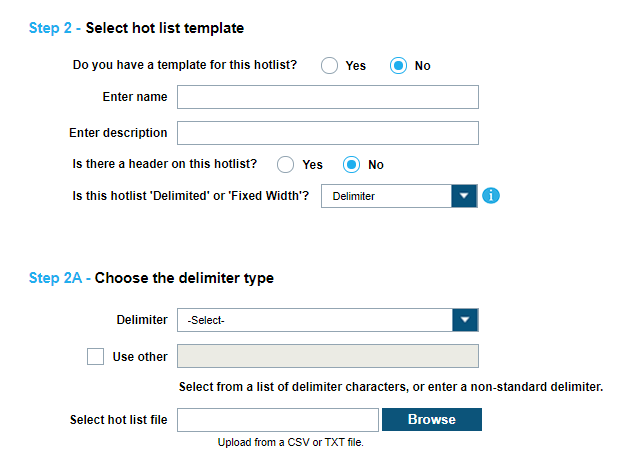
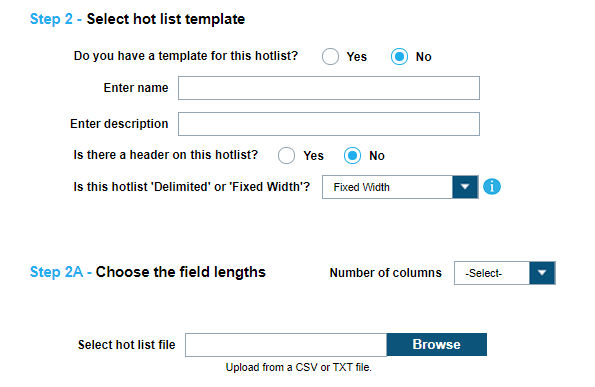
ClientPortal can select No if the template does not exists and begin the template creation process. First a Template Name is required, which is also used as the Source Name of the Hot List file. ClientPortal will want to enter a Hot List Template Description and define whether the file has a Header. Examine the Hot List file for a Header Row. This will be the first row of the Hot List. Select Yes or No based on if the Hot List has a Header Row. Lastly, ClientPortal will want to define whether the Hot List file is Delimited or Fixed Width. Indicate the method of data separation in the Hot List file as being Fixed Width or Delimiter. Delimited means that the columns are separated by a specific denoted character. Fixed Width means that the columns are separated by a specific number of characters for each column.
Choose the Delimiter Type
For Delimited, you will want to define what the delimiter type is. Examine the file and determine if there are any special characters that separate the data into separate fields. The most common are Comma, Semicolon, and Tab. ClientPortal has added these as defaults. You can also choose your own delimiter as well. If no delimiter is found, it can be Fixed Width or a special format.
Choose the Field Lengths
For Fixed Width, you will want to define the field lengths of each column. First, you will choose the number of columns in the Hot List file. From the count selected, you will want to define the length of each. Using a program like Notepad with a Status Bar can help determine the size of each column length. The column lengths must be one or greater (up to 500). If you wish to ignore specific columns, they can be skipped in Select Hot List Fields.
Select Hot List Fields
If correctly defined in Choose the Delimiter Type, you will now be displayed a series of Columns that correlate to the fields within the Hot List file. If the field separation is not correct, ClientPortal can select Back to update the Hot List field separation. If a header was available, it will displayed at the top of the sample data. To correctly map the fields, ClientPortal will want to select the fields from the drop-down box that pairs with the data seen. After a field is correctly mapped, ClientPortal will select OK to define the next column. Once all the columns have been defined, the template process is complete and ClientPortal can select Next to go on to Optional Hot List Details. If a column is not going to be used, ClientPortal can Skip the column and it will ignored when the file is uploaded to ClientPortal.

To create a custom column name, ClientPortal selects -New Column Name- to define the column description for the data displayed. You can have up to six custom column names or you can select one of nine default fields to choose from. Once you have used a default column name, it will be removed from the list. You can select -Insert Column Name- in order to push all of the column names to the right that have already been defined. Also, you can select -Delete Column Name- to move all of the column names to the left that have already been defined.
Hot Plate, State, and Alert are all the required fields. This means, ClientPortal must use the required fields in order to load the file. If ClientPortal does not have a State or Alert field, ClientPortal can define them manually from the following drop-down boxes. Each record in the Hot List will be assigned the value defined. If the Alert is not available in the drop-down box, a new Alert name can be created.
Optional Hot List Details
Optional Hot List Details
ClientPortal is able to Assign Alert Level for a specific Hot List file. This option will alert the Vigilant CarDetector user of the severity of the alert. When configured in Vigilant CarDetector, an Audio Alert will notify you of the severity as well as display the following color coded level for the Alert:
- Low-Yellow
- Medium-Orange
- High-Red
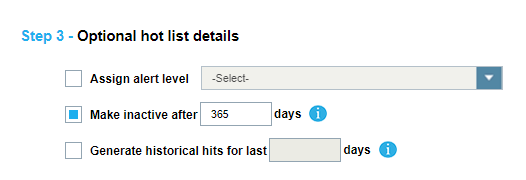
When adding a Hot Plate, ClientPortal has the option to make the record expire after a given period by selecting the Make Inactive after … days option. After a specified number of days, the record will become inactive but not be deleted. This allows for the record to become active again later. Also, there is the option to create hits from previous detections. When selecting Generate historical hits for last, ClientPortal can enter a specific amount of time to do historical hit look-ups. Essentially, this allows for the creation of hits of detections that are already on the system. This option can sometimes be useful for forensic data look-ups.
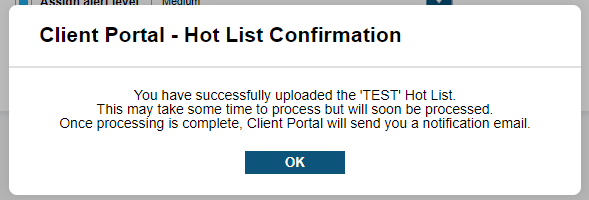
When finished making your decisions, select Upload Hot List, and you will be notified that your Hot List has been successfully uploaded. An email will be sent to the account email that uploaded the Hot List file. The email will confirm what Hot Lists records were successful, duplicates, and failed records. Likewise, you can use the Search Hot List File feature to query the state of the Hot List.
Auto Hot List
To automatically upload Hot List, go to .
You will be presented with the following options: New, View, Edit, Delete, Start, and Output Report.

To begin creating an Auto Hot List Schedule, select New.
Designate Hot List Details
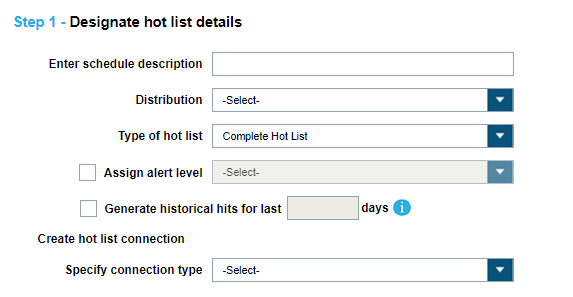
First, ClientPortal must give a description of the Schedule that will be used to look it up in the future (Example: Daily Local Warrants Hot List Upload). Then ClientPortal must define who will receive the Hot List using Distribution drop-down box. There are two options when assigning a Distribution of a Hot List to a Hot List data pool. First, ClientPortal is able to assign to All Site users. This option will add the Hot List to the Site-Wide Hot List data pool. The second option is to distribute to Select Users. This option will pull up a secondary dialog box to select individual users to receive the Hot Plate. This type of Hot List Distribution will define the Hot List as a user-Type Hot List.
When ClientPortal assigns the optional field Alert Level, ClientPortal can define whether the Hot List alert is High, Medium, or Low. All the Records within the Hot List will receive the Alert Level defined and will show up with the hit Records. Client Portal has the option to make the record expire after a given period by selecting the Make Inactive after … days option. After a specified number of days, the records will become inactive but not be deleted. This allows for the record to become active again later. When selecting Generate historical hits for last, Client Portal can enter a specific amount of time to do historical hit look-ups. Essentially, this allows for the creation of hits from detections that are already on the ClientPortal server. This option can sometimes be useful for forensic data look-ups but is not needed.
You will need to select a connection type via the Specify Connection Type drop-down box. The two selections available are: Remote Server - FTP and Remote Server - SFTP. Please contact Vigilant Support when setting up Local Server hot lists. Choose SFTP for Secure File Transfer Protocol or FTP for just File Transfer Protocol. Next, you will enter the IP Address (URL), Directory, user Name and Password. If the Port is different than the default for FTP or SFTP, you can change it to the specified port fort the server. When finished, you can select Test Connection to determine if the details are correct.
Select Hot List Template
Select Hot List Template
Before loading a Hot List, you must select a corresponding template. Once ClientPortal confirms that a template exists, you will be able select it from the Select a Template option. Select the desired template and choose Next. If the template is already being used by a different Auto Hot List or by a Shared Hot List, you will not see the template option. Only a single unique Template Source name can be assigned to an Site at any given time.
ClientPortal can select No if the template does not exists and begin the template creation process. First a Template Name is required, which is also used as the Source Name of the Hot List file. ClientPortal will want to enter a Hot List Template Description and define whether the file has a Header. Examine the Hot List file for a Header Row. This will be the first row of the Hot List. Select Yes or No based on if the Hot List has a Header Row. Lastly, ClientPortal will want to define whether the Hot List file is Delimited or Fixed Width. Indicate the method of data separation in the Hot List file as being Fixed Width or Delimiter. Delimited means that the columns are separated by a specific denoted character. Fixed Width means that the columns are separated by a specific number of characters for each column.
Choose the Delimiter Type
For Delimited, you will want to define what the delimiter type is. Examine the file and determine if there are any special characters that separate the data into separate fields. The most common are Comma, Semicolon, and Tab. ClientPortal has added these as defaults. You can also choose your own deliter as well. If no delimiter is found, it can be Fixed Width or a special format.
To load an Example Hot List File, that can help with assigning Column Names to the column data, choose Browse. You will prompted to navigate to the Hot List file and select. Once selected, you will see a fake path to the file and you can select Next to load it.
Choose the Field Lengths
For Fixed Width, you will want to define the field lengths of each column. First, you will choose the number of columns in the Hot List file. From the count selected, you will want to define the length of each. Using a program like Notepad with a Status Bar can help determine the size of each column length. The column lengths must be one or greater (up to 500). If you wish to ignore specific columns, they can be skipped in Select Hot List Fields.
To load an Example Hot List File, assign the Column Names to the column data, choose Browse. You will prompted to navigate to the Hot List file and select. Once selected, you will see a fake path to the file and you can select Next to load it.
Select Hot List Fields
If correctly defined in Choose the Field Lengths, you will now be displayed a series of Columns that correlate to the fields within the Hot List file. If the field separation is not correct, ClientPortal can select Back to update the Hot List field separation. If a header was available, it will displayed at the top of the sample data. To correctly map the fields, ClientPortal will want to select the fields from the drop-down box that pairs with the data seen. After a field is correctly mapped, ClientPortal will select OK to define the next column. Once all the columns have been defined, the template process is complete and Client Portal can select Next to go on to Create Hot List Update Schedule. If a column is not going to be used, ClientPortal can skip the column and it will ignored when the file is uploaded to ClientPortal.
To create a custom column name, ClientPortal selects -New Column Name- to define the column description for the data displayed. You can have up to six custom column names or you can select one of nine default fields to choose from. Once you have used a default column name, it will be removed from the list. You can select -Insert Column Name- in order to push all of the column names to the right that have already been defined. Also, you can select -Delete Column Name- to move all of the column names to the left that have already been defined.
Hot Plate, State, and Alert are all the required fields. This means, ClientPortal must use the required fields in order to load the file. If ClientPortal does not have a State or Alert field, ClientPortal can define them manually from the following drop-down boxes. Each record in the Hot List will be assigned the value defined. If the Alert is not available in the drop-down box, a new Alert name can be created.
Create Hot List Update Schedule
The final step when setting up a scheduled Hot List is to specify the schedule when the Hot List will be inserted into ClientPortal. The Use Daily Schedule will update the Hot List at a specified time each day.
You also have the option to set up for a Time Interval. Select the user Time Interval bullet to specify the duration and whether the duration is in Minutes or Hours. This is most commonly used when setting up with a Local connection type.
Lastly, you have the option to set up for a specific Schedule. Select the Customize Schedule bullet and specify the days of the week you wish to load. For each day selected, you must enter at least one time of load. There is the option to select up to two different load times. Likewise, you can select All Weekdays or just Weekends.
Once the schedule has been set, the final thing to do is to select Finish. You will see your Scheduled Hot List displayed in the Stopped state. Do not forget to highlight the new schedule and select the Start button to begin your Scheduled Hot list. Upon load, you will be notified via email of the number of records successfully loaded. If you notice that your hot lists are failing to load, please contact Vigilant Support for assistance.
View Hot List Templates
To view Hot List templates, go to .
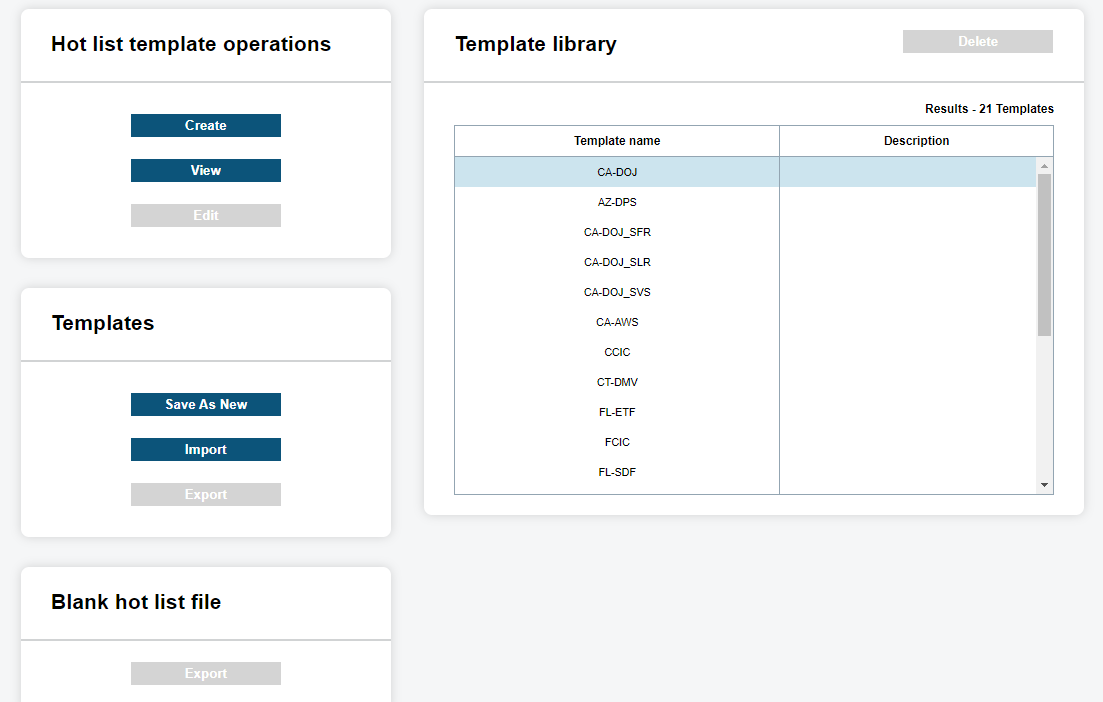
The Template Library will show you a list of the most common templates. These are our default templates. You have the option to highlight one of our default templates and select Save As New. This will generate a template from an existing default template. You will be prompted to enter a new template Name, Description, and Source. Included in the Template Library are templates created by the Site.
You can also Save as New and clone the user-generated templates with new naming conventions. If the Site-generated template included a Header Row, you can also select Export under Blank Hot List file to export a blank Hot List template. This file can be used as a basis for generating new Hot List files for importation.
There are also options to Import and Export templates from different Sites. This can be useful if you wish to share the templates with a local Site that also uses an identical custom template. Select Export, save file, share file, and allow the secondary Site to Import. If at any time you want to remove a template, simply select Delete.
Create or Edit Hot List Template
To manage Hot List templates, go to .
Hot List Templates allow you to create, view, and edit the templates. If you selects Create, they will go through the Hot List Template Wizard. Once created, you can select View to confirm selection or Edit to modify prepopulated fields.
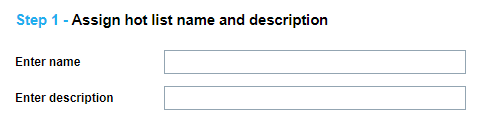
Assign Hot List Name and Description
ClientPortal first will want to enter a unique and short name of the Template. A larger description can be added that describes what the template applies to. The Template Name is also the Source Name of the Hot-File. If the Template Name is a duplicate, you will be prompted to enter a different name.
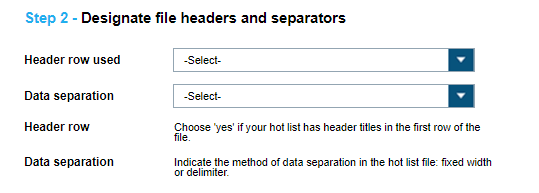
Designate File Headers and Separators
Designate file headers and separators
Examine the Hot List file for a Header Row. This will be the first row of the Hot List. Select Yes or No in the dropdown box based on if the Hot List has a Header Row. Next, ClientPortal must examine if the Hot List data is separated by a special character or if it is a Fixed Width. The best way to determine if it is Fixed Width is to count the number of characters in a row. If each row is identical in length, it could be Fixed Width. If you find the Hot List to be Delimiter separated, you will be prompted to select a character.
Choose the Field Lengths
For Fixed Width, you will want to define the field lengths of each column. First, you will choose the number of columns in the Hot List file. From the count selected, you will want to define the length of each. Using a program like Notepad with a Status Bar can help determine the size of each column length. The column lengths must be one or greater (up to 500). If you wish to ignore specific columns, they can be skipped in Step 2B.
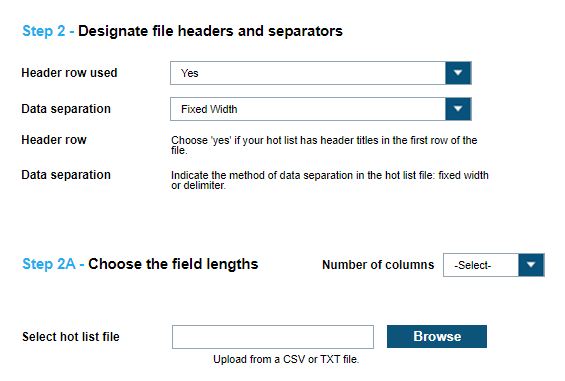
To load an Example Hot List File, assign the Column Names to the column data, choose Browse. You will prompted to navigate to the Hot List file and select. Once selected, you will see a fake path to the file and you can select Next to load it.
Select Hot List Fields
Select Hot List Fields
If correctly defined in Designate File Headers and Separators, you will now be displayed a series of Columns that correlate to the fields within the Hot List file. If the field separation is not correct, ClientPortal can select Back to update the Hot List field separation. If a header was available, it will displayed at the top of the sample data. To correctly map the fields, ClientPortal will want to select the fields from the drop-down box that pairs with the data seen. After a field is correctly mapped, ClientPortal will select OK to define the next column. Once all the columns have been defined, the template process is complete and Client Portal can select Finish. If a column is not going to be used, Client Portal can Skip the column and it will ignored when the file is uploaded to Client Portal.
Enter a title for the Custom fields
When selecting Custom Fields from Select Hot List Fields, you are given options to include custom Titles for each custom field. You simply need to enter a short description of each Custom field that corresponds to the order selected in Select Hot List Fields. When done, select Finish and your Hot List Template will save and show up in the Template Library.
Search Records
To search for Hot List records, go to .
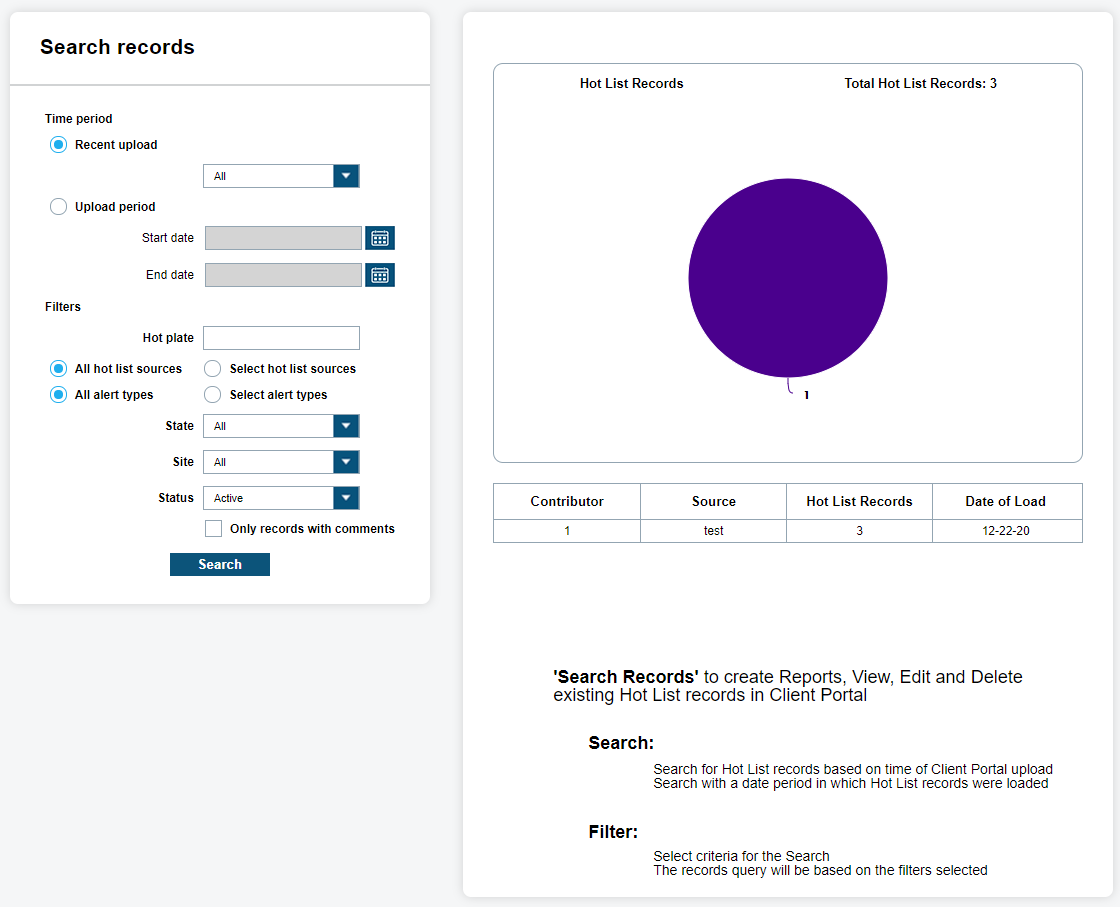
To be able to search for uploaded Hot List records, select , and then select Search Records. From there, you will be presented with Time Period and Filters to narrow down your desired results. You will also be presented with a Dashboard view of the total records listed for each Hot List Source. Within this dashboard, you will also be presented with the Total Hot List Records. This is the total Active records associated with all visible Hot Lists for the site manager that is logged into ClientPortal.
Time Period
Time-Period allows you to choose between Last 24 hours to Last 60 Days to All records for Recent Uploads. Also, you can choose Upload Period to choose Start and End date using the calendar tool.
Filters
The Filters allow you to define a Hot Plate, Hot List Source Alert Type(s), State, Site, and Status. When searching for a specific plate that is on a Hot List, the Hot Plate filter can be used. The Hot List Source is a dynamically populated option that fills with Sources based on access. You can see the ClientPortal, CDMS Client, or CDFS Client Source names to denote a single Hot Plate loaded.
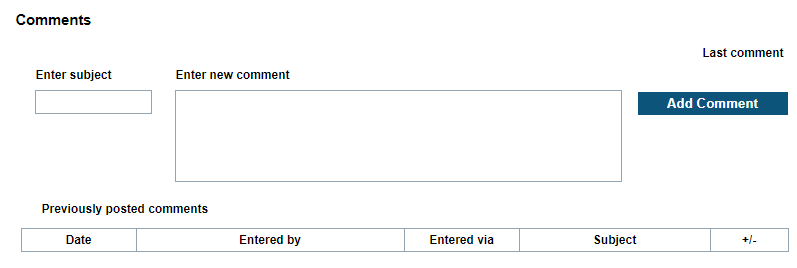
The Alert Type(s) filter option will dynamically list all Alerts that are found for each Source. When you disable a Hot List Source, it will automatically update the Alert Type(s) and remove those Alerts. Therefore, you only see the Alerts that are selectable. The State filter is dictated by Hot List records and can be used for US or Non-US provinces. By selecting the Site filter, you will be able to define whether the Alert came from your Site, a personal Hot List, or a Shared Hot List from another Site. You can also filter by Hot List Status with the options being Active, Inactive, or All. A Hot List can become inactive after a period or by selecting the individual Hot List and making it inactive. Lastly, ClientPortal has the option to only show Hot List records with comments. When viewing a Hot List, you can attach a personal comment to the record as seen below.
Search Results
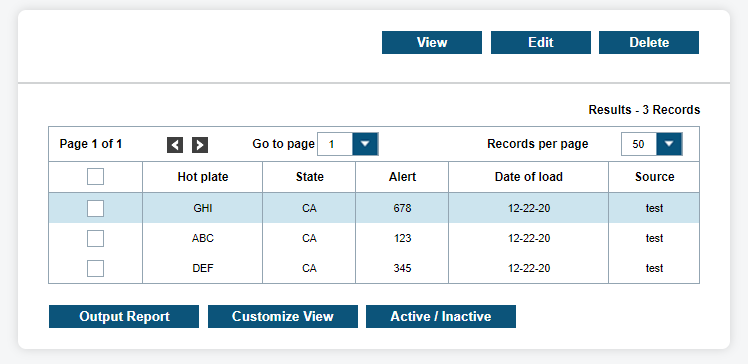
Once all the Filters and Time Period have been selected, you will select Search to start the query. You will presented with each Hot List record in chronological order. The default table view will include Hot Plate, State, Alert, Order Date, and Source name. Source will show the letter “(S)” next to the name if it is a Hot List that is being shared with your Site. You can select Edit only if the Hot List belongs to your site. Premiere Hot Lists are also uneditable to keep the integrity of the Hot List intact.
You can highlight a record and click View to view the Hot Record details within a pop-up display. All the Hot List Data fields in the table will be listed, and including Site, Loaded By, Date of Load, Status, and Order ID. Further Vehicle Data can be entered based on the Template. This can include Owner, Year, Make, Model, VIN, or it can include custom fields such as Name, Address, and Description.

If you scroll to the bottom for Comments, you can append Hot List comments to the bottom of the record. These comments can include descriptions that are not included on the original Hot List record. Enter the Subject and New Comment and click Add Comment. Each comment will appear below the Hot List records in minimized form. You can select + to expand comments. From the Hot Record Detail, you can also select Output Report to generate report or Close to close the window.
Search Files
To search for Hot List files, go to .
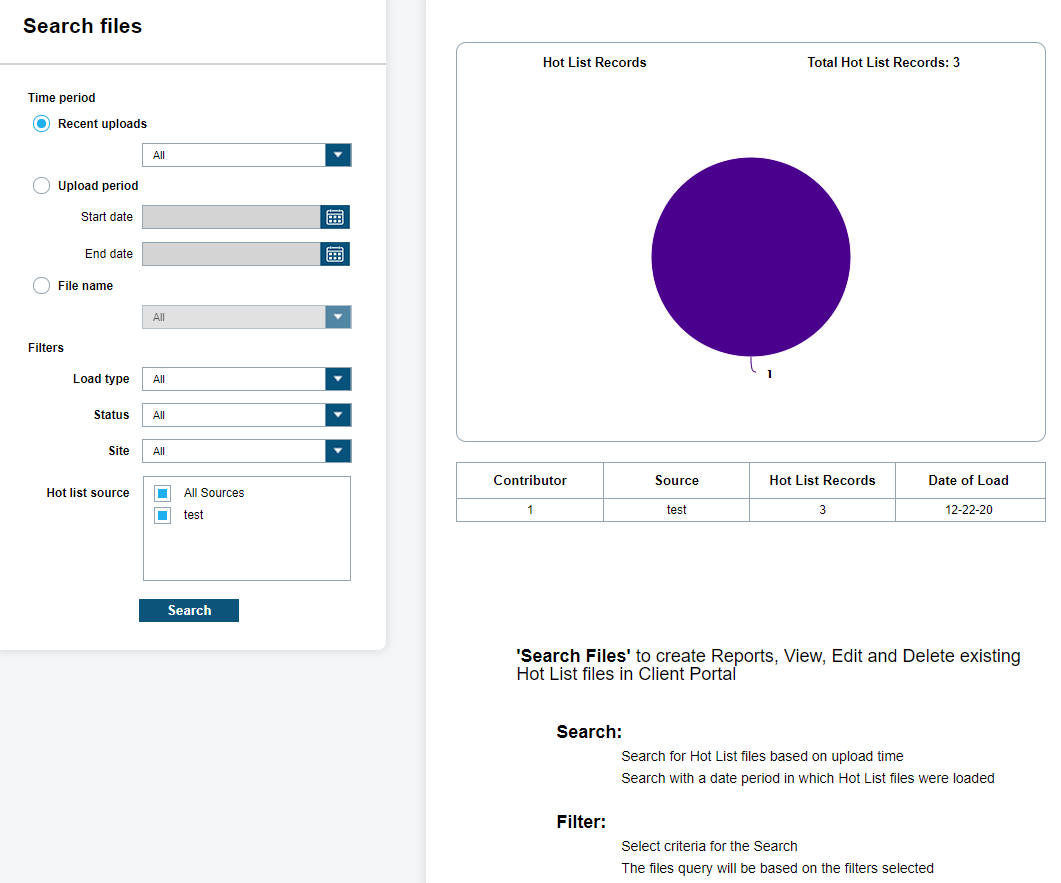
To be able to search for uploaded Hot List files, select tab, and then select Search Files. From there, you will be presented with Time Period and Filters to narrow down your desired results. You will also be presented with a Dashboard view of the total records listed for each Hot List Source. Within this dashboard, you will also be presented with the Total Hot List Records. This is the total Active records associated with all visible Hot Lists for the site manager that is logged into ClientPortal.
Time Period
Time-Period allows you to choose between Last 24 hours to Last 60 Days to All files for Recent Uploads. Also, you can choose Upload Period to choose Start and End date using the calendar tool. The final option for Time-Period is to choose the specific File Name.
Filters
The Filters section includes the Load Type, Status, Site, and Hot List Source. The Load Type, will give you the option to narrow down the results to Manual Hot Lists, Auto Hot Lists, or single Hot Plates. You can also filter by Hot List Status with the options being Active, Inactive, or All. A Hot List can become inactive after a period or by selecting the individual Hot List and making it inactive. By selecting the Site filter, you will be able to define whether the Hot List came from your Site, a personal Hot List, or a Shared Hot List from another Site. The Hot List Source is a dynamically populated option that fills with Sources based on access. You can see the ClientPortal, CDMS, or CDFS source names to denote a single Hot Plate loaded by those systems.
Search Results
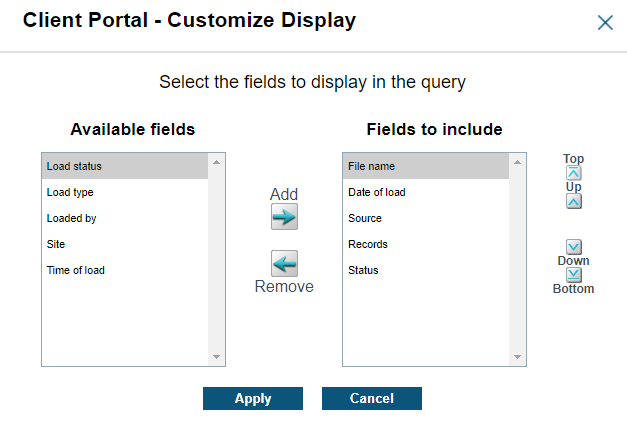
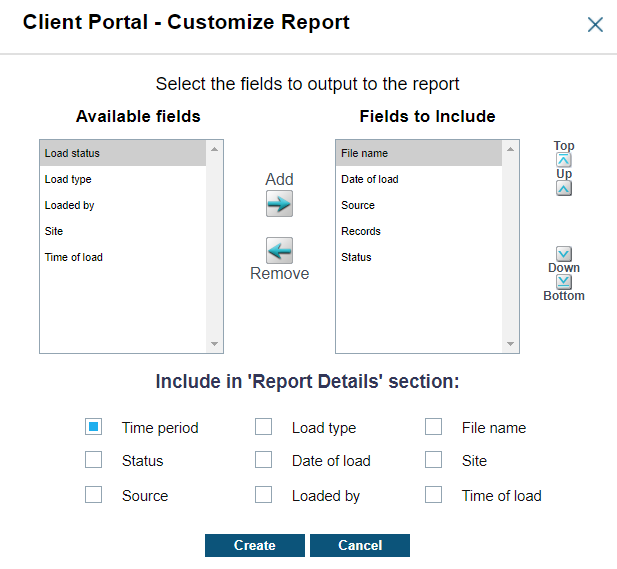
Once you are finished Entering the Filters and Time Period, you can select Search to populate the table with your results. The table will include File Name, Date of Load, Source, Records, and Status. When you select View, you will be sent to the Search Records section and it will automatically query the records for the selected file. You can customize the output using the Customize View option. The Customize Display pop-up will allow the addition of Site, Load Status, Load Type, Loaded By, and Time of Load to the current table. To add or remove fields to the fields to include, simply highlight the field and select Add or Remove based on the field priority. Likewise, the fields can be moved up and down in the order to display. The top fields will display left to right on the table. Click Apply to save the customize view.

Reports
Reports can be made from Search Records or Search Files
Search Records Reports
When you select Output Report, you will be presented with options to export available records. Currently, this includes all fields except for Custom fields and Comments. To add or remove fields to the fields to include, simply highlight the field and select Add or Remove based on the field priority. Likewise, the fields can be moved up and down in the order to display. The top fields will display left to right on the report. When you are ready to output the report, choose the format of report in PDF or XLS, and click Create. You will be prompted for a location to store the report.
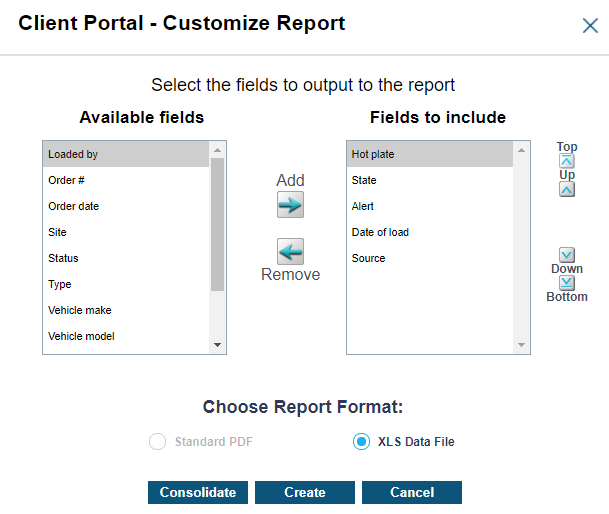
Another report option is to Consolidate the report using the Consolidation Tool. You will be presented with a list of fields to include in the Report Details section. All other fields will be consolidated within the report. When you open the report, it will state which fields have been consolidated.
Lastly, you will have the option is to Customize View for the table. Similar to reports, ClientPortal is able to select which custom view suites your needs. To add/remove fields to the fields to include, simply highlight the field and select Add or Remove based on the field priority. Likewise, the fields can be moved up and down in the order to display. Starting with the top fields, they will display left to right within the table. You can use the scroll bar at the bottom of the table to scroll left to right after adding new fields.
The final option within Hot List Search Records is to make individual records Active or Inactive. If a Hot List record is Active and you wish to make Inactive, simply click on the Active/Inactive button. The record will remain inactive until activated again or reloaded. Records that are Inactive will not generate hits. hit Records that had their Hot List become inactive, will see that the hit Records also become inactive. The hits will have the state of Previous and will be hidden from default views.
Search Files Reports
You can Output Report the uploaded files to a report, which will have the option to include and exclude fields. To add/remove fields to the fields to include, simply highlight the field and select Add or Remove based on the field priority. Likewise, the fields can be moved up and down in the order to display. The top fields will display left to right on the report. You will also have the option to consolidate fields at the top of the report by check boxing the fields with common qualities, which remove the redundant columns. When you are ready to output the report, choose the format of report in PDF or XLS, and click Create. You will be prompted for a location to store the report.
There is the option to Edit and Delete Hot List files. First, when you Edit a Hot List file, you can change the Distribution method from All Site users to Select users. You can also change when the Hot List becomes inactive by selecting the Make Inactive after … days option. You can also generate historical hits if this option was not originally selected on first upload. After making the changes, click Save.
If you want to delete all the Hot List Records loaded, simply highlight the desired file and click Delete. You will be prompted to confirm your selection.
The final option within Hot List – Search Files is to make entire files Active or Inactive. If a Hot List file is active, and you want to inactivate it, click the Active/Inactive button. The file and all records associated with it will remain inactive until activated again or reloaded. Files that are Inactive will not generate hits with the records within. Hit Records that had their Hot List become inactive, will see that the hit Records also become inactive. The hits will have the state of Previous and will be hidden from default views.
Making Base Hot List
To create a Base Hot List, go to .
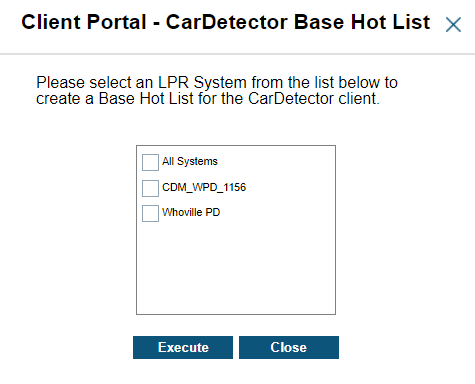
A Base Hot List includes all the Hot List records for your Site. To be able to decrease the time it takes to download the Hot List records, or if there are technical purposes for being disconnected from ClientPortal, ClientPortal has included the option to Make Base Hot List..
You will be presented with the option to select which systems to flag for a Base Hot List. Check the individual system box or check the All System box, and select Execute. You will be prompted to save the Base Hot-Hot List to a local drive. Once a system has been flagged for a Base Hot List, no new Hot Lists will distribute until the Base Hot List has been ported to the client.