Site Management
My Site
To manage My Site, go to .
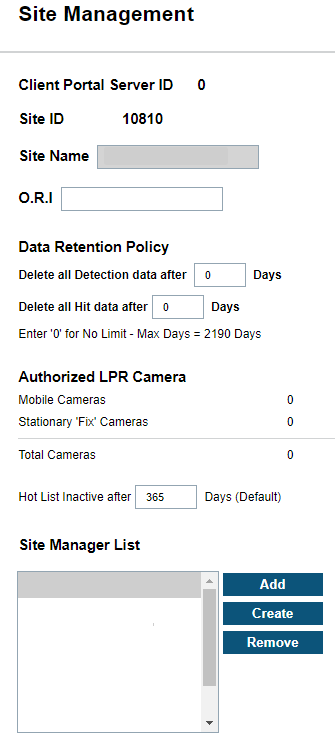
The site manager can set the number of days to retain the site detection data and/or hit data. The default is ‘0’ which is unlimited data retention. Site managers are also allowed to add, create, or remove other site managers for their site.
For best practice, set data retention according to site policy and/or local legislation. If unlimited retention is not required, use 5 years (1,825 days) to cover statutes of limitations.
When a site manager chooses to Create another site manager, they must include all mandatory fields (Username, Password, Name, Address, City, Zip, Phone, and Email).
For best practice, use am_<first initial><last name> or am_<first name><last name> for the site manager username.
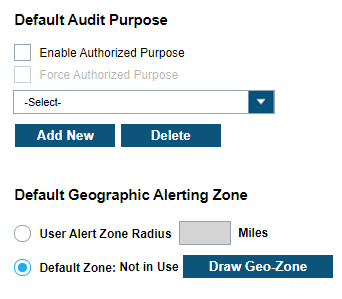
Within the My Site section also, the site manager can set a geographic zone area. Site managers can draw an site-limiting zone using a polygon drawing tool. This zone prevents the view of any detections/hits outside of the zone to the site users. This is not required if no geographic restrictions are needed. First, select Default Zone: Not in Use check box. Then, select Draw Geo-Zone to use the polygon drawing tool.
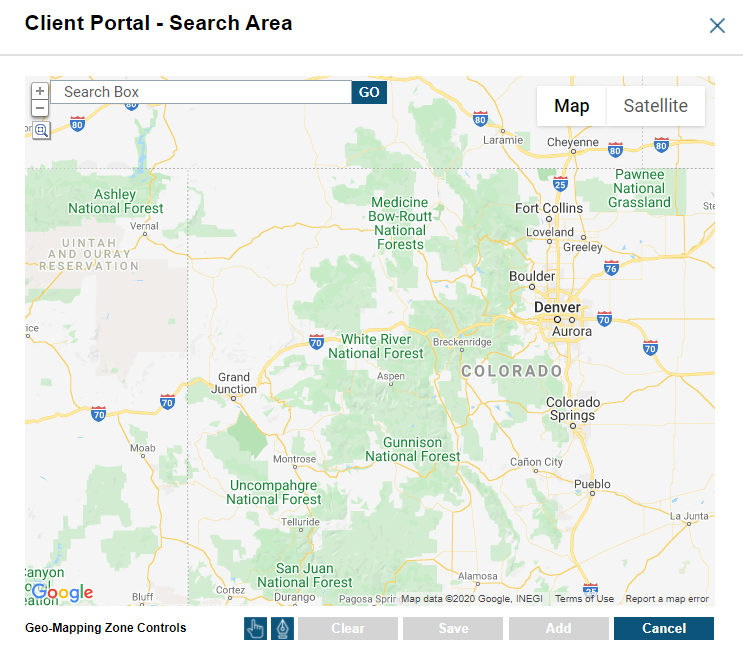
To use the polygon drawing tool, use the Google Map zooming tools in upper left corner to zoom-in on region to select. Next, select the Polygon icon to begin polygon creation. Generate polygon selection by left-clicking on the map with at least three points. To reset the zone, click Clear, and draw again. You can add multiple zones by clicking Add. Click Save to save the zone and click Update.
The Commercial Data Subscription Period dashboard allows the ability to review your subscription periods of private data assigned to your site. You can view the total subscription period remaining and credits consumed as it relates to private data.
Mobile Camera Systems
Mobile Camera Systems Configuration
To configure Mobile Camera Systems, go to . Site Managers are capable of viewing, creating, editing, and deleting systems for Mobile LPR Camera System.
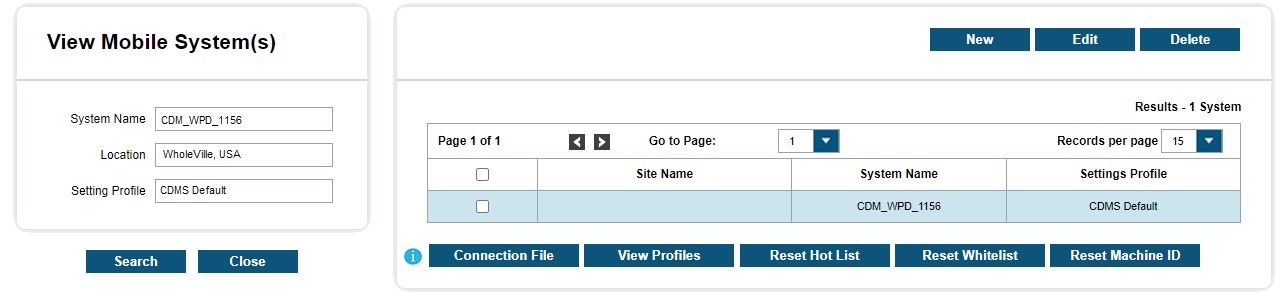
When viewing the mobile system, you can select System Name, Location, or Setting Profile to filter through different systems. List of current associated systems is located on the right.
The table will list the Site Name, System Name, and Settings Profile that is associated with the system. Traditional page navigation is used in the case of having more than 15 systems within the site.
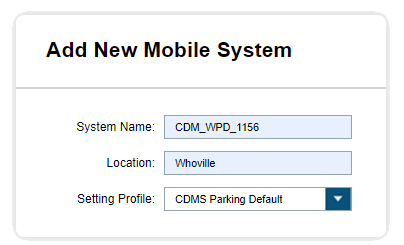
To create a new system, select the New button above the table. This will take you to the following that allows you to insert a System Name, Location, and select a Setting Profile. A typical System Name would be the type of system (CDM vs. CDF) followed by an agency acronym and vehicle number. Something that is unique and defining is recommended. LOCATION is not a required field but can be useful when dealing with multiple locations. The Setting Profile allows you to choose the default profile or from custom-made profiles. You can start with CDMS Default profile and alter later. To delete a system, simply highlight the desired system select Delete. You will be prompted to confirm.
Use the Reset Machine ID button to reset the Machine ID of the selected system and allow it to be reassigned. Each mobile camera system must be dedicated to one client machine to prevent unintentional splitting of hot list and white list distribution. If that client machine becomes unusable, it cannot be used for another machine. However, site managers can reset the Machine ID of the affected system and the Machine ID can be reassigned for new machines.
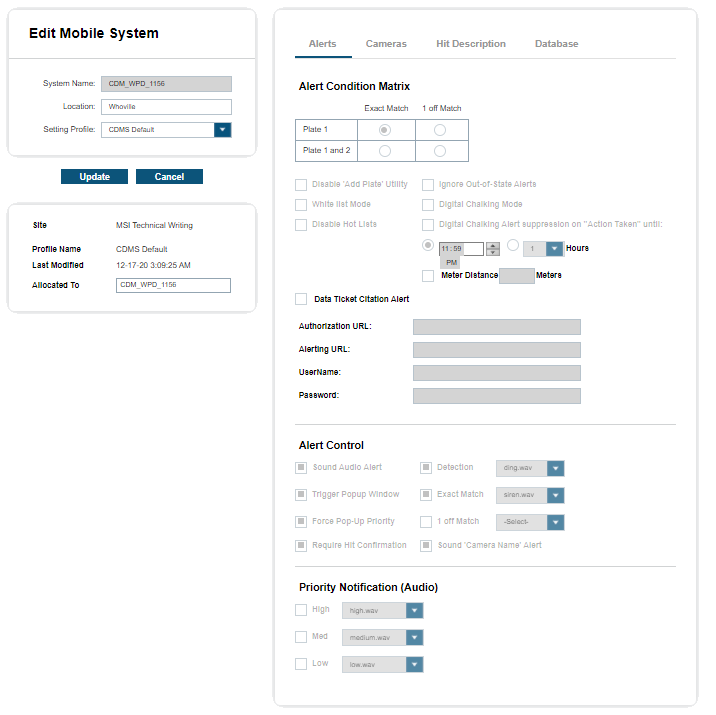
Once a CarDetector Mobile System (CDMS) has been created, you can edit the selected system and change the location or CDMS profile. On the right, you will see the values listed with the Setting Profile that is selected. It will list the Site, Profile Name, Last Modified date, and other systems that the profile is allocated to. The alerts tab will list the Alert Condition Matrix, Alert Control, and Priority Notification for audio alerts.
CarDetector Mobile Systems Configuration
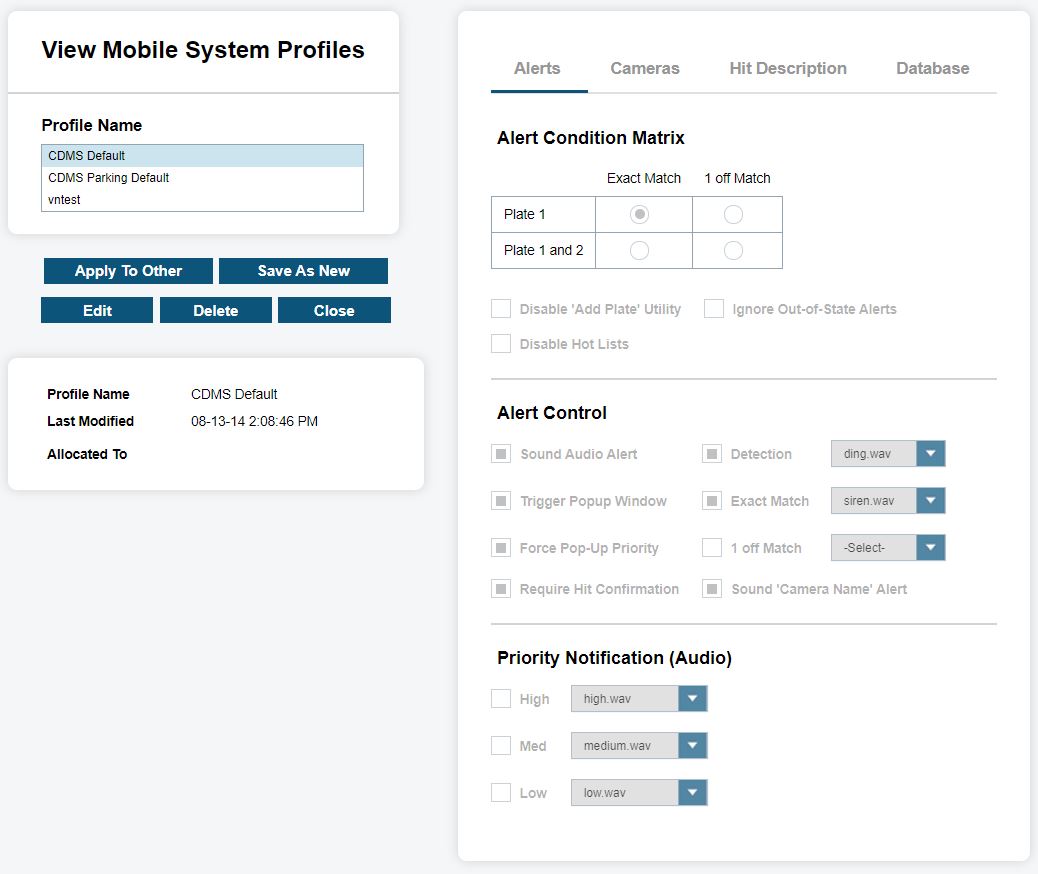
To view and edit system profiles, select the View Profiles option at the bottom of the table listing for mobile systems. From there, you will be presented with the option to apply the selected profile to other systems using the Apply To Other button. Once the system is selected, simply select Apply to push settings to the vehicle. The CDMS Default profile cannot be edited. Instead, you must select Save As New to generate a new system profile from the CDMS Default settings. You will then be prompted to enter a new profile name. Once renamed, select Apply To Systems and you can select the systems desired.
Alert Condition Matrix controls the following Alert Conditions:
- Plate 1
- Plate 1 and 2
- Exact Match
- 1 off Match
- Plate 1
- This option only alerts you when there is a match (detection = hot-plate) on the first attempted Optical Character Recognition (OCR). For captured images, the system can have multiple scans for character recognition.
- Plate 1 And 2
- This option allows for multiple OCR attempts on same capture. Having two scans of the image can increase the chance of a match. This feature is useful if If there are many misreads associated with similar characters (Example: 8 vs. B, O vs. Q)., this feature can be useful. However, there will also be an increase of false-positive matches associated with selecting PLATE 1 AND 2. Therefore, it is recommended to use PLATE 1 as the default in most situations unless the Hot List is small or the plates are harder to read OCR.
- Exact Match
- This option alerts you when there is an exact match between the detection and hot-plate record. If one or more characters do not match, you will not be alerted. This selection is useful when accuracy is desired in alerts.
- 1 Off Match
- This option is used when you wish for you to be alerted in the case of the hot-plate record being one character different from the Plate read. This can be useful when there is a small Hot List or when there are many plates that are always one character wrong. For example: a plate is scanned with “A8C123”, and the hot-plate is “ABC123”. Since the scanned plate was one character off, an alert would still notify the user. In the case of being two characters off, no alert would appear. This option greatly increases your chances of false-positives and it is recommended to use the default of Exact Match for most situations.
The Disable Add Plate Utility feature can lock the CarDetector Mobile System down from allowing you to add plates from the client. This can effectively prevent all hot lists from being installed on the system when combined with user Permissions. Thus, allowing full control over hot lists residing on the LPR system and ensuring no alerts are generated Ad Hoc.
The Ignore Out-of-state Alerts feature allows for you to only be alerted if a hot-plate has a correct State ID associated with the location of the capture. For example: A hot-plate can have the State ‘CA’, but the GPS of the capture shows ‘NV’. If this feature is selected, no alert will be made.
Enable the White List Mode feature to allow this system to download White Lists from Vigilant ClientPortal. This is required for the digital chalking feature to work.
The Digital Chalking Mode feature enables parking violation alerts to be sent through TAS or email from this Car Detector Mobile system. Digital Chalking 'marks' detected vehicles and checks whether further detections of the same vehicle are outside of a given GPS location. If a vehicle stays in the same location past the scheduled allotment (set in White List Location Rule-Sets), it will trigger Vigilant ClientPortal to send an alert. Use the Meter Distance check box to set the distance beyond which a vehicle is considered to have moved. Subsequent detections from the same vehicle within this distance will not generate digital chalking alerts. Increase this distance to compensate for GPS error/drift.
Suppression of digital chalking alerts can also be configured until a time-out period or fixed time has elapsed after action has been taken on them.
When Data Ticket Integration is enabled for a site by a Vigilant ClientPortal Administrator, the Data Ticket Citation Alerts option will appear.
Data Ticket Citation Alerts generate alerting on all White List and digital chalking (expired parking) hits when the Data Ticket Citation is configured with valid credentials. This allows 3rd party "Data Ticket" services and hand-held devices to process hits against Unauthorized Vehicles on their Vigilant ClientPortal White Lists, personal White Lists, and digital-chalking hits.
You have the ability to assign a Data Ticket Handheld Alerting credential for each system profile. This way, you will only be alerted to the scanned vehicles.
- Sound Audio Alert
- Notify you through a sound alert using the Exact Match and/or 1 Off Match sound files that can be configured to the right of selection. Likewise, the Detection sound file can be configured for audio alert.
- The Trigger Popup Window
- Allows you to be notified with an alert screen that overlays the Vigilant CarDetector program in the form of a pop-up screen. This popup window will remain in foreground, unless Force Pop-up Priority is unselected.
- Force Pop-up Priority
- When unselected, Force Pop-up Priority will allow the ability to minimize the pop-up screen.
- Require Hit Confirmation
- When selected, you will be required to confirm the accuracy of captured hit.
- When unselected, you can close the alert pop-up without confirming the hit. The user can go back to the hit record later to confirm the accuracy.
- Sound Camera Name Alert
- Alert you with the name of the camera that captured the matching plate. Therefore, if the LPR system has four cameras, you can quickly orient their attention to the direction of the camera that captured the hit.
The Priority Notification (audio) settings will help to notify you based on the priority level of the Hot List that was loaded. When loading a Hot List, you can assign an alert level from Low, Medium, and High. When a match is generated, and a hit alert pushed, an extra audio alert will describe the level of the alert. This extra sound file can be turned on/off when coordinated with Hot List alert levels. For example, if you have a Hot List with low priority, perhaps no audio alert is needed. However, if you had a Hot List with high level, you would desire an extra audio alert in the audio notice.
The Cameras tab allows for the selection of OCR Profile, LPR Camera Type, Camera Naming, and Camera Controls. The OCR Profile allows you to choose Region Select for the region that the Vigilant CarDetector will be operating in. Because license plate design differs from state to state, the system uses Optical Character Recognition (OCR) algorithms that are unique to each region. To increase capture and character recognition, you will want to select the region that most closely resembles the plates being captured. The LPR Camera Type will allow for the selection between our two types of camera styles, which are the older C-Series cameras and the newer Raptor LPR cameras. Like regional options, choosing the correct style of camera will allow for optimum capture rates because our algorithms are designed around the video collected on the different hardware.
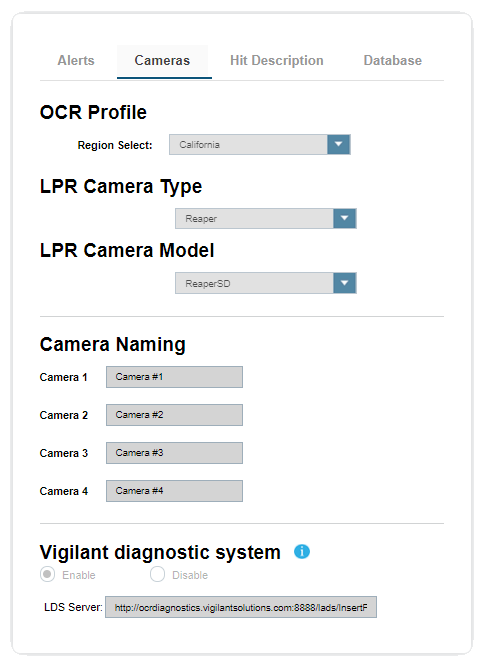
The Camera Naming selection allows you to control specific names based on the camera orientation. For example: front passenger, rear driver, etc. In most scenarios, the camera orientation will not be known until configured in the vehicle. This area can be used to rename a camera to something more meaningful.
Camera Controls is based on your LPR camera type and will allow you to control hardware settings when connected through RS232 or RS485 cable. It is recommended to keep the defaults setting.
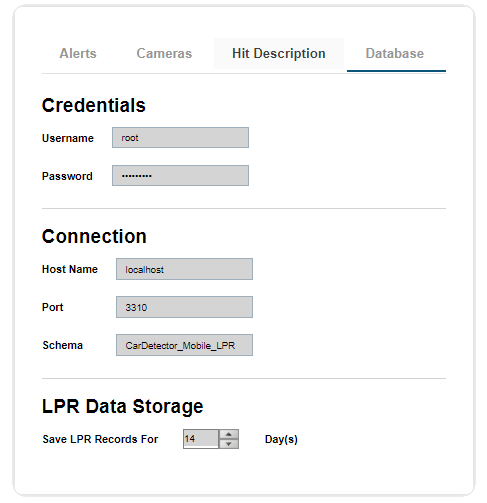
The Database tab will show Credentials, Connection, And LPR Data Storage options. The Credentials for the local LPR database are not currently configurable now. The Connection is not currently remotely configurable for Host Name nor Port. The Schema can be altered to specify a new database name. This can have the effect of wiping a system clean in the case of corrupt database, performance issues, or out-of-synch Hot Lists. It is recommended keeping default schema name. Lastly, you can configure the LPR Data Storage, which controls the retention policy for detection CarDetector records. Records that are older than the specified retention policy will be purged from LPR. This is acceptable as all detections should be uploaded to the system for archival purposes. The minimum is one day, and the maximum is 719 days.
This completes the system profile setup and you will want to select Save to store the profile and to propagate to the selected systems.
Before any system can be connected, they must have a connection file. The Connection File link allows for file creation of the encrypted <System.ini> file. This encrypted file is used to link the Vigilant CarDetector client. It is common practice to download the file through browser directly to CDMS, or to use a USB ‘thumb’ drive to deliver the file. The file must be stored in the Vigilant CarDetector root directory.
The last option regarding CarDetector Mobile System is the ability to reset a system’s Hot List remotely by selecting Reset Hot List. Once selected, the checked system will clear out the current Hot List at the client and send current Hot List in packages to the CarDetector software.
Fixed Camera Systems
Fixed Camera Systems Configuration
To configure Fixed Camera Systems, go to . Site Managers are capable of viewing, creating, editing, and deleting fixed systems for LPR.
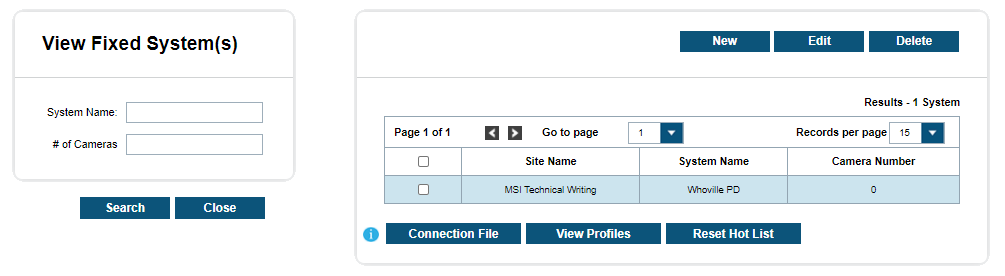
When viewing fixed systems, you can select System Name or # of Cameras to filter through different systems. To the right of the filters, will be a list of current systems associated with the site. The table will list the Site Name, System Name, and Camera Number that is associated with the system. Traditional page navigation is used in the case of having more than 15 systems within the site.
CarDetector Fixed System Configuration
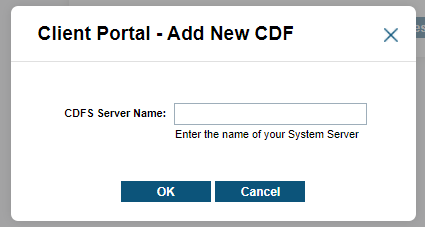
To create a new system, select the New button above the table. This will prompt you for a new CarDetector Fixed Systems (CDFS) Server Name. A typical system name would be the type of system (CDM vs. CDF) followed by the acronym and machine ID or location. Something that is unique and defining is recommended. Confirm the settings for the following tabs:
- Basic
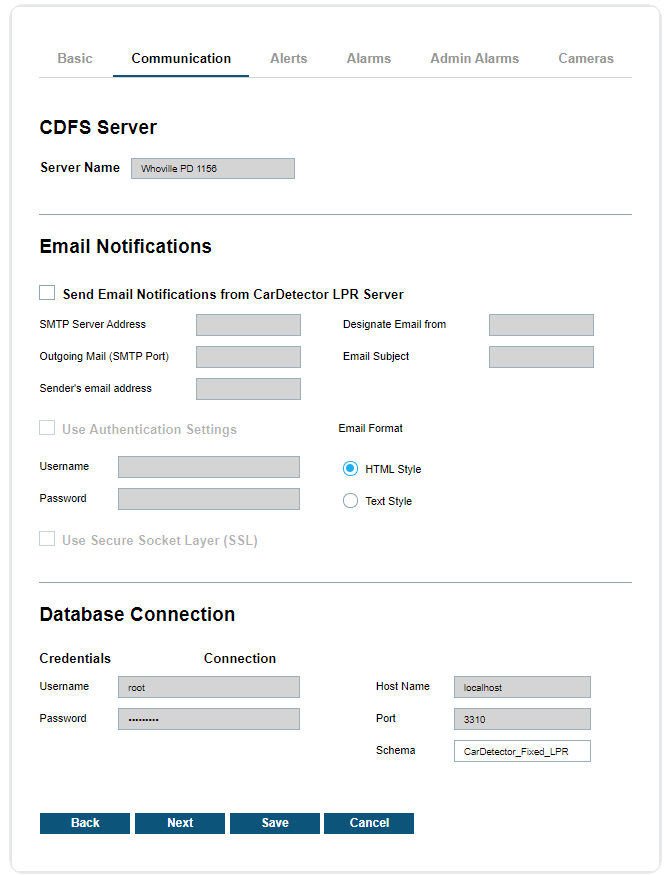
- Communication
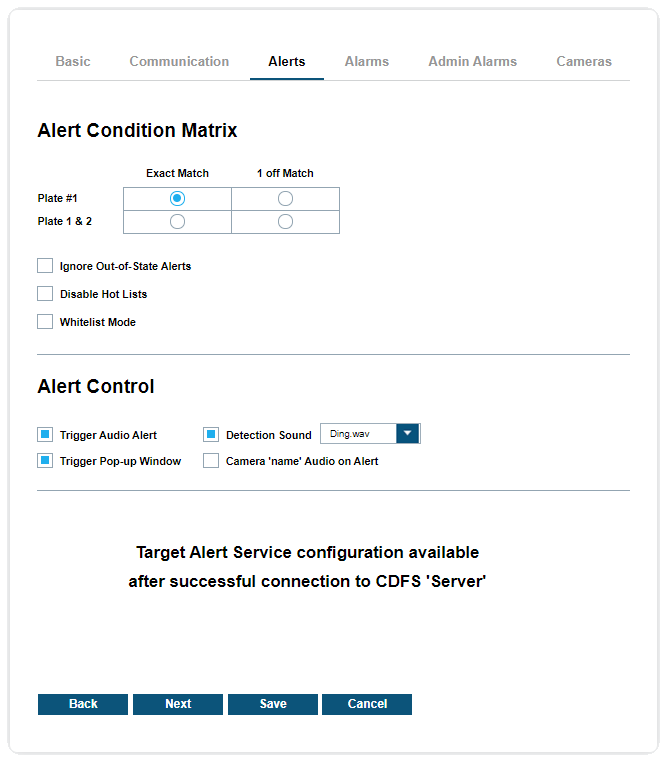
- Alerts
- Alarms
- Admin Alarms
- Cameras
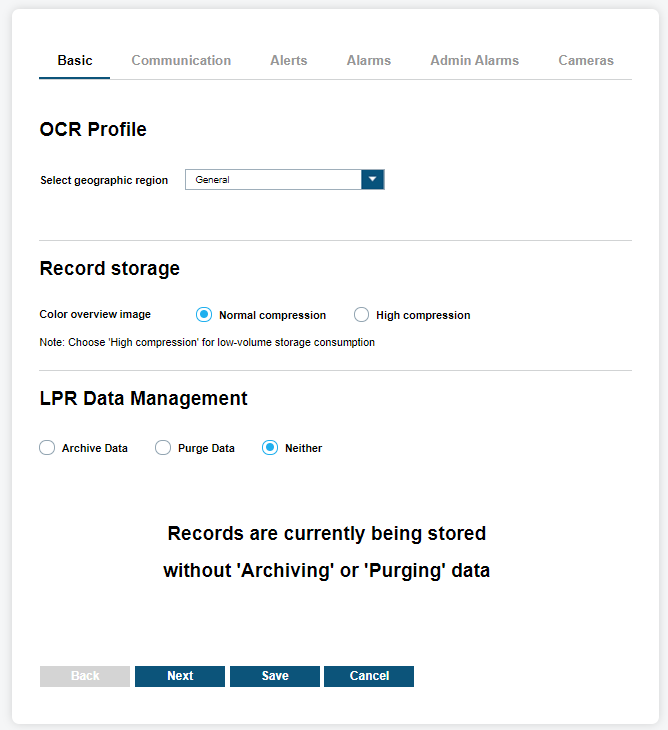
For the Basic tab, you can configure the Optical Character Recognition (OCR) Profile, Record Storage and Vigilant CarDetector Data Management. The OCR Profile allows the user to choose select geographic region for the region that the Vigilant CarDetector will be operating in. Because license plate design differs from state to state, the system uses OCR algorithms that are unique to each region. To increase capture and character recognition, you will want to select the region that most closely resembles the plates being captured. When selecting the OCR Profile, you will also want to choose between the Raptor camera profiles or the traditional camera settings. Record Storage allows for the choice between Normal Compression and High Compression for the color overview image. Depending on storage capacity, this will dictate the best compression option.
The Communication tab includes the CDFS Server, Email Notifications, and Database Connection. Email Notifications allows the configuration of emails to be sent directly from CDFS to specific users and CDFS Administrators. This is done by porting to an SMTP Server or SMTP Relay Server using credentials from your IT Administrator. There are the options to use Secure Socket Layer (SSL) and output in HTML or text. The Database Connection is not currently remotely configurable for Username, Password, Host Name nor Port. However, the Schema name can be altered to specify a new database name. This can have the effect of wiping a system clean in the case of corrupt database, performance issues, or out-of-sync Hot Lists. It is recommended to keep the default schema name unless troubleshooting.
Next, the Alert tab is used for configuration of the Alert Condition Matrix, Alert Control and Target Alert Service (TAS). The details of these configurations are already explained in CarDetector Mobile Systems Configuration.
The Alarms tab allows for the input of Alert Settings and Custom Alert Fields. When configuring Alert Settings, you will first highlight the Alert Type you wish and select Modify. An Alarm Info window pop-up will allow the user to configure the Audio File from the default sound files. A drop-down box with each default alarm on CDFS will be included in dropdown box.
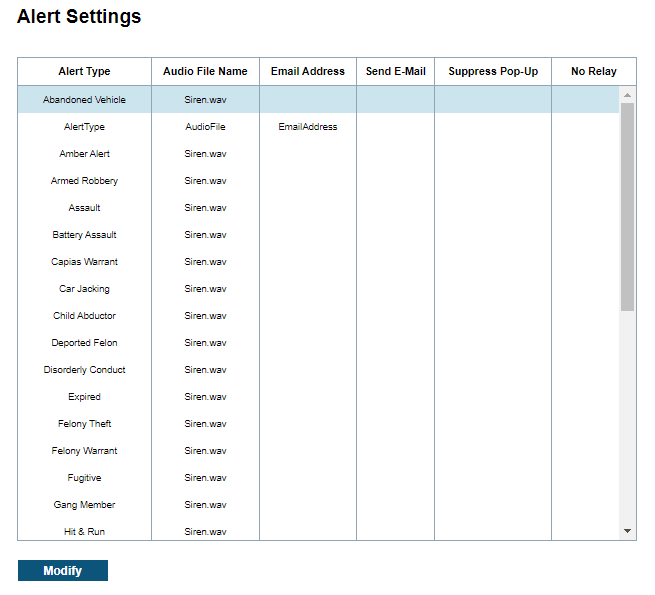
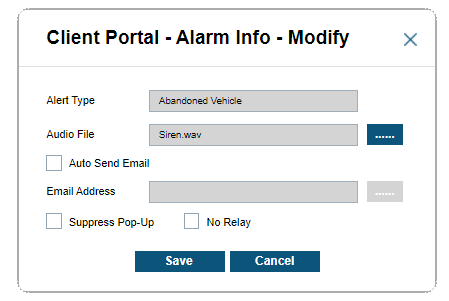
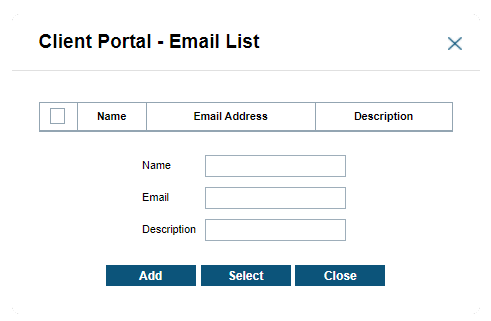
Also, there is an ability to send email notification to select users when a hit is generated on the alert by selecting Auto Send Email. This is done through the email list pop-up, which allows the creation of specific users to be notified directly from CDFS when the SMTP configuration is set up. Once the user is created, be certain to select the user and select to apply email. Lastly, there is the option to Suppress the Pop-Up and ignore configured relays with No Relay. See CDFS documentation for more information on relays.
When configuring Custom Alert Fields, you will be presented with up to six fields to customize in the system and viewable in CDFS. When a Hot List is loaded, users can upload up to six custom points of data. These titles will override the titles generated with the templates and display them as their custom names. Likewise, if you wish to hide specific custom fields, simply uncheck the field that applies to column you wish to suppress, and CDFS will suppress this data.
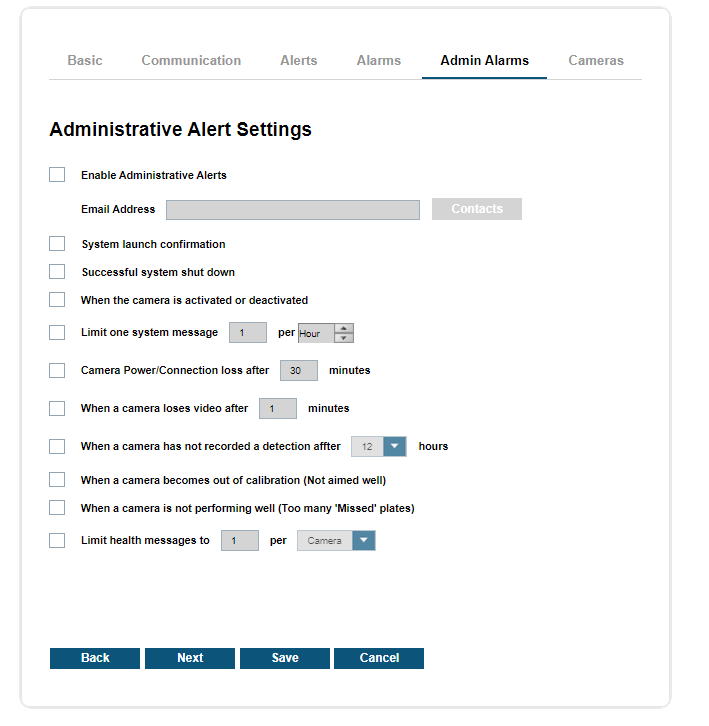
With the Admins Alarms tab, you can control all aspects of the Administrative Alert Settings. You can enable email alerts to a specific email address or from a contact list by selecting the Contacts button. Once configured for an address, you have the option to be notified when the System launches, gracefully shuts down, or when cameras become activated or deactivated. You can limit these System messages to X per minute/hour. Also, you can be notified when a camera loses power after X minutes or when a camera loses video after X minutes. You can also be notified when no detections have been recorded after X hours or if the camera is out of calibration. Lastly, you can be notified when too many missed plates are received. Finally, you can limit your health messages to X per X cameras.
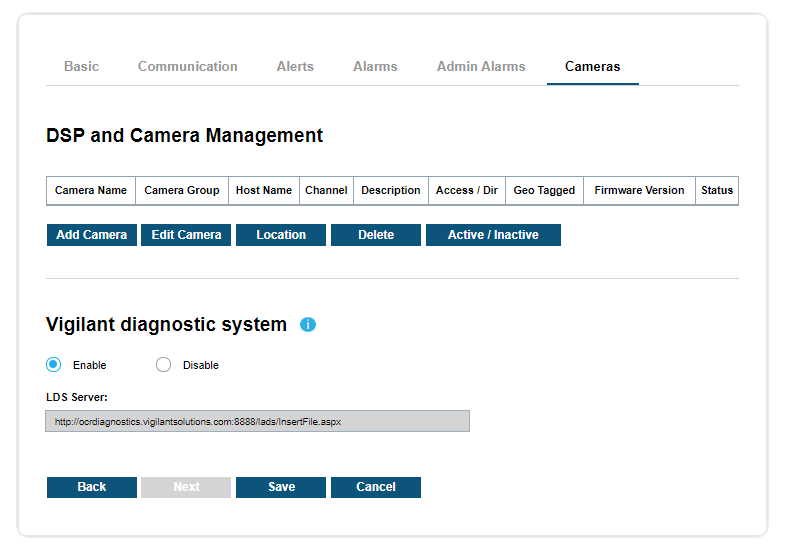
The Cameras tab allows managers to modify camera settings, activate, deactivate, and view the current configuration. Within DSP and Camera Management, you will find the Camera Name, Camera Group, Host Name, Channel, Description, Access/Direction, Geo Tag flag, Firmware Version, and Status. To activate a camera, simply highlight desired inactive camera and click on Active. To deactivate camera, simply highlight desired active camera and click on Deactivate.
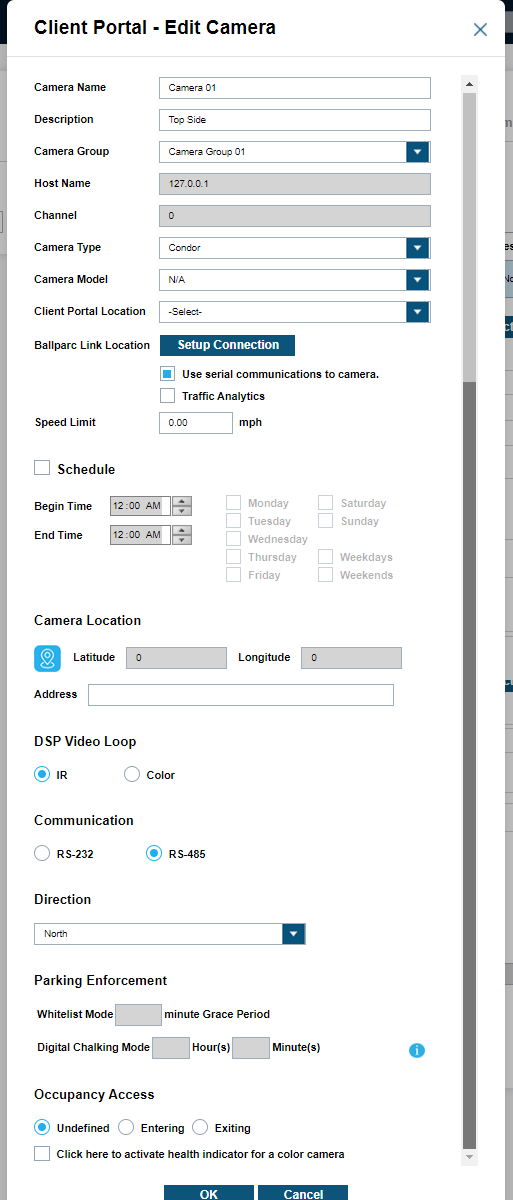
Within the Edit Camera option, you can edit Camera Name, Description, Camera Group, Camera Model, Serial Communications, Schedule, Camera Location, and Access/Direction. For Camera Group, you can select from a dropdown menu. For Camera Model, you can select from a dropdown menu with Raptor, C-Series, or Other camera models. When configuring the Schedule, this controls when to activate and deactivate the camera. You can choose Begin and End times, and the days of the week for the schedule. The Access/Direction has a dropdown with selections that demonstrate the vectors of the targets.
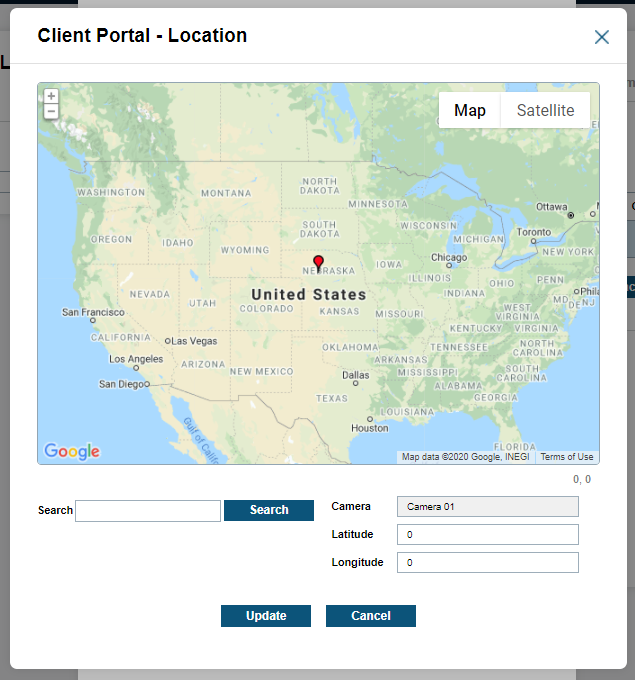
When using the Camera Location configuration tool to input GPS coordinates, you will be presented with a pop-up that uses a Google Maps API. In the Search section, you can put in an address of the location of the camera. You can use the map to move the pin to an exact location. Once moved, the Latitude and Longitude will be dynamically updated. If needed, these coordinates can also be updated manually to the needed accuracy. After editing, click Update and Close to save coordinates.
You can set the Digital Chalking Mode feature in the Parking Enforcement section to generate TAS Alerts for parking violations exceeding a period of time not on a parking white-list. A Grace Period can also be set to postpone alerts until a vehicle can be added to a parking white-list. After this period has elapsed, an alert will be sent if the vehicle has not been added.
Before any system can be connected, the clients must have a connection file. The Connection File allows for file creation of the encrypted ‘System.ini’ file. This encrypted file is used to link the Vigilant CarDetector client. It is common practice to download the file through browser directly to CDFS, or to use a USB drive to deliver the file. The file must be stored in the Vigilant CarDetector root directory.
The last option regarding CarDetector Fixed Systems is the ability to reset a system’s Hot List remotely by selecting Reset Hot List. Once selected, the checked systems will clear out the current Hot List at the client and send current Hot List in packages to the Vigilant CarDetector software.
Standalone Camera Systems
Viewing Standalone Cameras
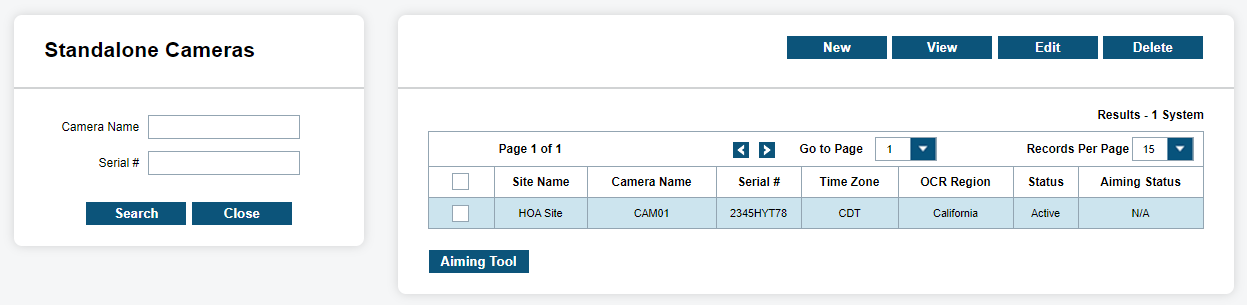
As a site manager, you are able to view, create, edit, and delete Standalone Cameras. Standalone cameras are self-contained systems that operate without an attached LPR system. When viewing the Fixed systems, you may enter a camera name or serial number and click Search to filter through different systems. To the right of the filters, will be a list of current systems associated with the site. The table will list the Site Name, Camera Name, and Serial Number that is associated with the camera along with region and status information. Traditional page navigation is used in the case of having more than 15 systems within the site.
Standalone Cameras Configuration
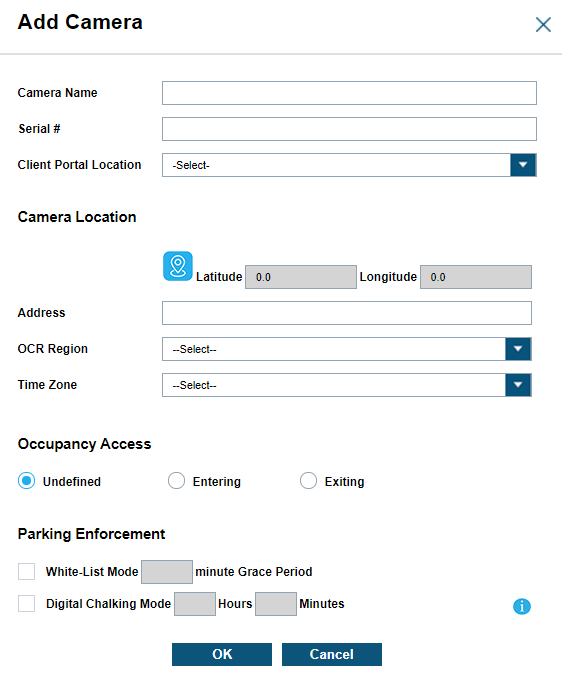
To create a new system, select the New button. The Add Camera window will appear and prompt the user for a Camera Name, Serial Number, and Location. It is recommended to use camera names are of a standardized format and are unique and defining, like a site acronym and Machine ID or location. The Serial # should be the actual serial number of the camera. Location is a predefined White List or Hot List location created in White List or Hot List Management.
In the Camera Location section, the pin icon can be used to search for an address to automatically complete the Latittude, Longitude, Address and Time Zone fields. The OCR Region is generally the state/territory that the address is in.
If this camera is set up as monitoring the entrance or exit of a location for occupancy management, it can be set with the appropriate radio button in the Occupancy Access section.
You can set the Digital Chalking Mode feature in the Parking Enforcement section to generate TAS Alerts for parking violations exceeding a period of time not on a parking White List. A Grace Period can also be set to postpone alerts until a vehicle can be added to a parking White List. After this period has elapsed, an alert will be sent if the vehicle has not been added.
From the View/Edit windows, the existing camera information added with the new window can be viewed or modified. Additionally, the Aim Camera utility and camera Token can be accessed from these windows.

For more information on adding L5Q cameras for Homeowner's Associations, see Homeowner Associations ClientPortal User Guide on https://learning.motorolasolutions.com/.