White List Management
Add White Plate
To upload the White List file, go to .
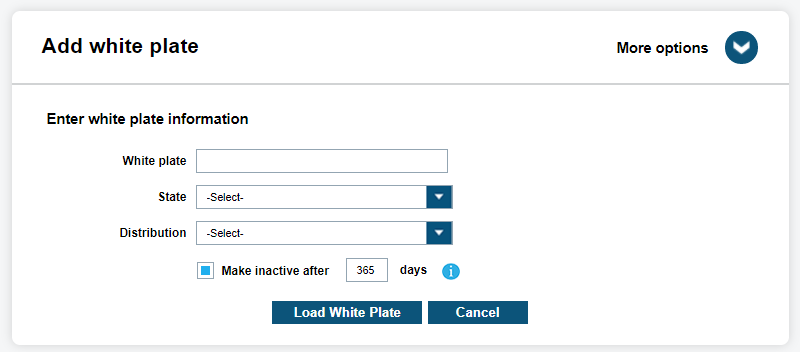
Users can add white lists site-wide. We have three mandatory fields when uploading a white plate:
- White Plate – license plate number
- Registration State
- Distribution
There is currently only one option when assigning a Distribution of a white list and that is to assign to All Site Users. Once the white list has been successfully loaded, a zone location must be assigned to it, so that unauthorized vehicles within the zone will be alerted upon.
Upload White List File
To manually upload White List file, go to .

Select File for Distribution
This list consists of numerous White Plate records and is usually supplied by a local or regional government agency. First, the site manager will want to Select a File for the White List desired. Using the Browse button you will navigate to the file. It will display a shortened path to the White List. The file must be less than 30 MB in size to upload. If it is larger than 30 MB, please contact Vigilant Support and request assistance splitting the file. Next, the site manager will select the Distribution to assign to a specific White List pool. With the first option, ClientPortal is able to assign to All Site users. This option will add the White List to the Site-Wide White List data pool. The final option is to define if the Type Of White list with the following selections:
- Complete White list
- Select this when all records are supplied with the file
- Incremental White List
- Select either add or remove when the file consists of only part of the White List records.
Select White List Template
Select White List Template
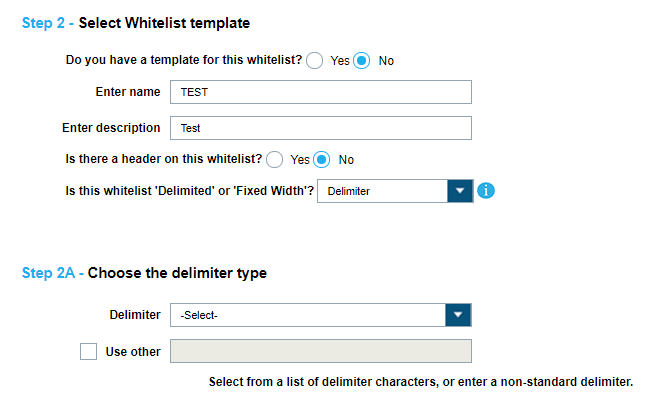
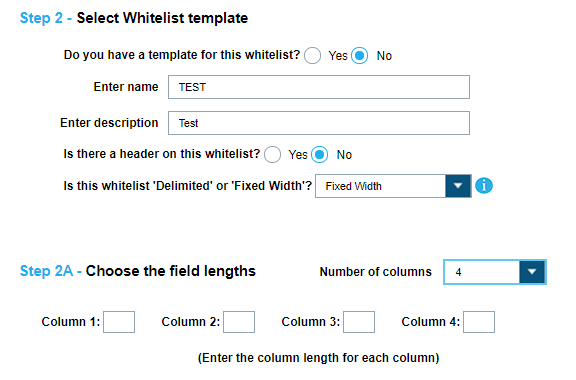
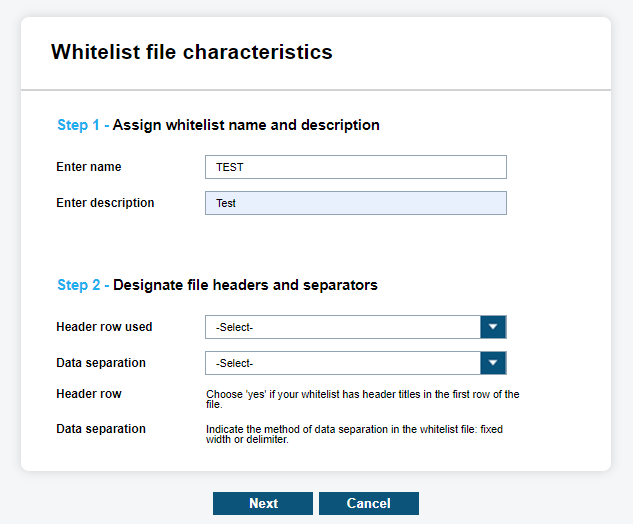
Before loading a White List, you must select a corresponding template. Once ClientPortal confirms that a template exists, you can select it from the Select a Template option. Only a single unique Template Source name can be assigned to an Site at any given time.
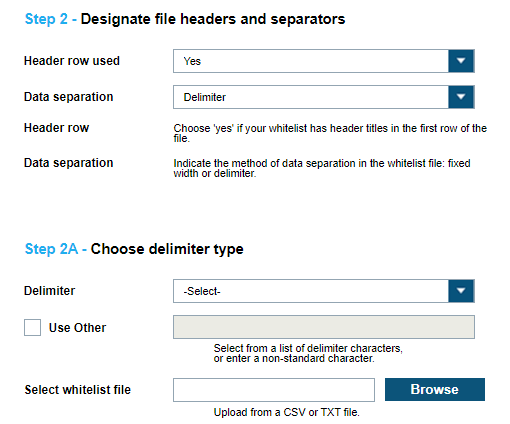
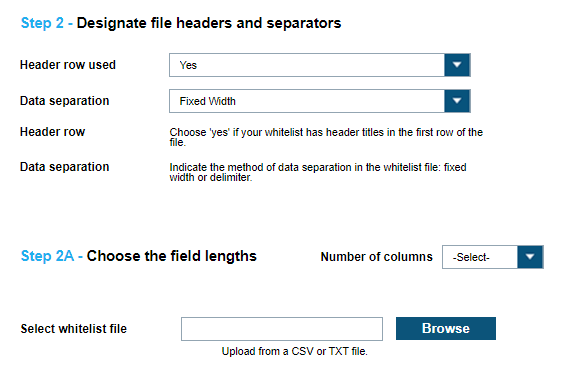
ClientPortal can select No if the template does not exists and begin the template creation process. First a Template Name is required, which is also used as the Source Name of the White List file. ClientPortal will want to enter a White List Template Description and define whether the file has a Header. Examine the White List file for a Header Row. This will be the first row of the White List. Select Yes or No based on if the White List has a Header Row. Lastly, ClientPortal will want to define whether the White List file is Delimited or Fixed Width. Indicate the method of data separation in the White List file as being Fixed Width or Delimiter. Delimited means that the columns are separated by a specific denoted character. Fixed Width means that the columns are separated by a specific number of characters for each column.
Choose the Delimiter Type
For Delimiter, you will want to define what the delimiter type is. Examine the file and determine if there are any special characters that separate the data into separate fields. The most common are Comma, Semicolon, and Tab. ClientPortal has added these as defaults. You can also choose your own deliter as well. If no delimiter is found, it can be Fixed Width or a special format.
Choose the Field Lengths
For Fixed Width, you will want to define the field lengths of each column. First, you will choose the number of columns in the White List file. From the count selected, you will want to define the length of each. Using a program like ‘Notepad’ with a ‘Status Bar’ can help determine the size of each column length. The column lengths must be one or greater (up to 500). If you wish to ignore specific columns, they can be Skipped in Select White List Fields.
Select White List Fields
If correctly defined in Choose the Field Lengths, you will now be displayed a series of Columns that correlate to the fields within the White List file. If the field separation is not correct, ClientPortal can select Back to update the White List field separation. If a header was available, it will displayed at the top of the sample data. To correctly map the fields, ClientPortal will want to select the fields from the drop-down box that pairs with the data seen. After a field is correctly mapped, ClientPortal will select OK to define the next column. Once all the columns have been defined, the template process is complete and Client Portal can select Next to go on to Optional White List Details. If a column is not going to be used, ClientPortal can Skip the column and it will ignored when the file is uploaded to ClientPortal.
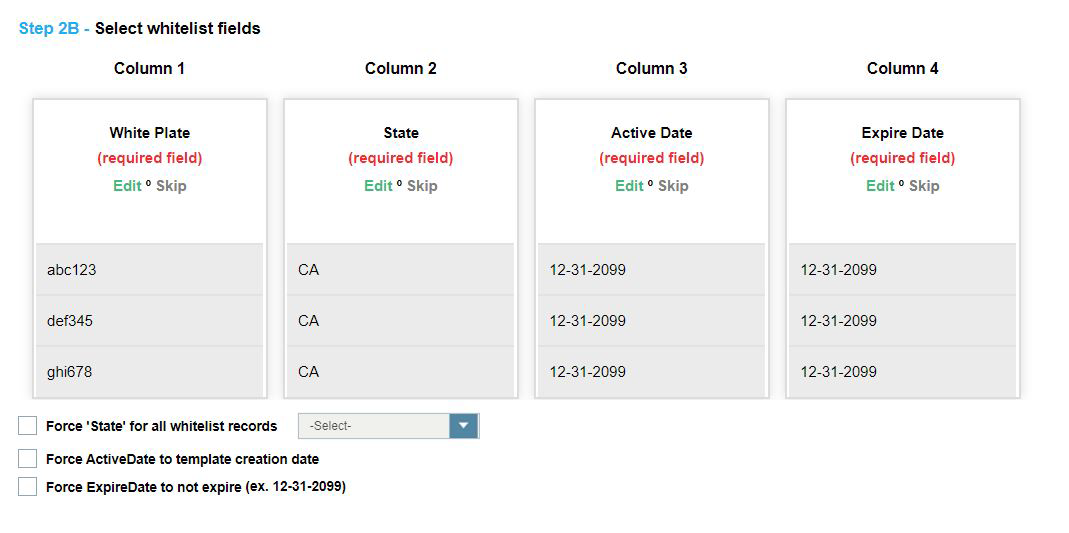
To create a custom column name, ClientPortal selects -New Column Name- to define the column description for the data displayed. You can have up to six custom column names or you can select one of nine default fields to choose from. Once you have used a default column name, it will be removed from the list. You can select -Insert Column Name- in order to push all of the column names to the right that have already been defined. Also, you can select -Delete Column Name- to move all of the column names to the left that have already been defined.
White Plate, State, and Alert are all the required fields. This means, ClientPortal must use the required fields in order to load the file. If ClientPortal does not have a State or Alert field, ClientPortal can define them manually from the following drop-down boxes. Each record in the White List will be assigned the value defined. If the Alert is not available in the drop-down box, a new Alert name can be created.
All White Lists require the ActiveDate and ExpireDate fields to be included. White Lists that do not include these fields will have them automatically appended with their default values.
When selected, the Force ActiveDate to template creation date and Force ExpireDate to not expire (ex. 12-31-2099) check boxes will forcibly set the activation and expiration dates for each record in the White List, even if the ActiveDate and ExpireDate fields already exist in the whitelist.
Optional White List Details
Optional White List Details
ClientPortal is able to Assign Alert Level for a specific White List file. This option will alert the Vigilant CarDetector user of the severity of the alert. When configured in Vigilant CarDetector, an Audio Alert will notify you of the severity as well as display the following color coded level for the Alert:
- Low-Yellow
- Medium-Orange
- High-Red

When adding a White Plate, ClientPortal has the option to make the record expire after a given period by selecting the Make Inactive after … days option. After a specified number of days, the record will become inactive but not be deleted. This allows for the record to become active again later. Also, there is the option to create hits from previous detections. When selecting Generate historical hits for last, ClientPortal can enter a specific amount of time to do historical hit look-ups. Essentially, this allows for the creation of hits of detections that are already on the system. This option can sometimes be useful for forensic data look-ups.
When finished making your decisions, select Upload White List, and you will be notified that your White List has been successfully uploaded. An email will be sent to the account email that uploaded the White List file. The email will confirm what White Lists records were successful, duplicates, and failed records. Likewise, you can use the Search White List File feature to query the state of the White List.
Parking Enforcement White List
To automatically upload White List, go to .
You will be presented with the following options: New, View, Edit, Delete, Start, and Output Report.
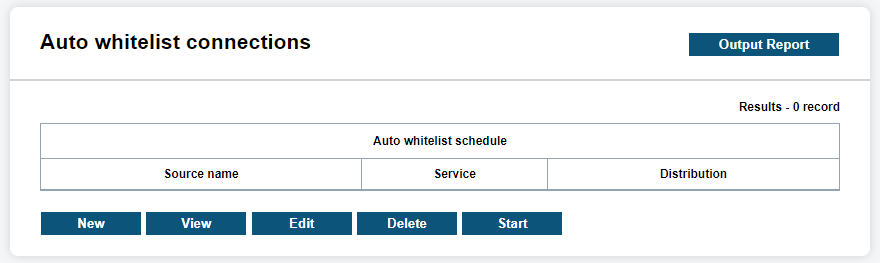
To begin creating an Auto White List Schedule, select New.
Designate White List Details
First, ClientPortal must give a description of the Schedule that will be used to look it up in the future (Example: Daily Local Warrants White List Upload). Then ClientPortal must define who will receive the White List using Distribution drop-down box. There is currently only one option when assigning a Distribution of a White List to a White List data pool. First, we can assign to All Site you. This option will add the White List to the Site-wide White List data pool.
When ClientPortal assigns the optional field Alert Level, ClientPortal can define whether the White List alert is High, Medium, or Low. All the Records within the White List will receive the Alert Level defined and will show up with the hit Records. Client Portal has the option to make the record expire after a given period by selecting the Make Inactive after … days option. After a specified number of days, the records will become inactive but not be deleted. This allows for the record to become active again later.
You will need to select a connection type via the Specify Connection Type drop-down box. The two selections available are: Remote Server - FTP and Remote Server - SFTP. Please contact Vigilant Support when setting up Local Server White Lists. Choose SFTP for Secure File Transfer Protocol or FTP for just File Transfer Protocol. Next, you will enter the IP Address (URL), Directory, user Name and Password. If the Port is different than the default for FTP or SFTP, you can change it to the specified port fort the server. When finished, you can select Test Connection to determine if the details are correct.
When a connection type has been selected, notification options for White List connection exceptions will appear. you will receive an email notification depending on the selected notification conditions as follows:
- When the Send Notice On Load check box is selected, you will be notified when the White List is downloaded from the remote source.
- When the Alert On Failure To Load Once Per Hour check box is selected, you will be alerted every hour that the White List fails to download.
- When the Send Alert On Failure To Receive Or Load After [ ] Days [ ] Hours check box is selected, you will be alerted each time the specified time period entered into the DAYS and HOURS fields elapses."
- When the Data Ticket Connection Type is selected, you will receive alerts on all White List hits and digital chalking (expired parking) hits. This allows Data Ticket to process hits against Unauthorized Vehicles on their white lists, and also personal white lists.
Select White List Template
Select White List Template
Before loading a White List, you must select a corresponding template. Once ClientPortal confirms that a template exists, you will be able select it from the Select a Template option. Select the desired template and choose Next. If the template is already being used by a different Auto White List or by a Shared White List, you will not see the template option. Only a single unique Template Source name can be assigned to a site at any given time.
ClientPortal can select No if the template does not exists and begin the template creation process. First a Template Name is required, which is also used as the Source Name of the White List file. ClientPortal will want to enter a White List Template Description and define whether the file has a Header. Examine the White List file for a Header Row. This will be the first row of the White List. Select Yes or No based on if the White List has a Header Row. Lastly, ClientPortal will want to define whether the White List file is Delimited or Fixed Width. Indicate the method of data separation in the White List file as being Fixed Width or Delimiter. Delimited means that the columns are separated by a specific denoted character. Fixed Width means that the columns are separated by a specific number of characters for each column.
Choose the Delimiter Type
For Delimited, you will want to define what the delimiter type is. Examine the file and determine if there are any special characters that separate the data into separate fields. The most common are Comma, Semicolon, and Tab. ClientPortal has added these as defaults. You can also choose your own deliter as well. If no delimiter is found, it can be Fixed Width or a special format.
To load an Example White List File, that can help with assigning Column Names to the column data, choose Browse. You will prompted to navigate to the White List file and select. Once selected, you will see a fake path to the file and you can select Next to load it.
Choose the Field Lengths
For Fixed Width, you will want to define the field lengths of each column. First, you will choose the number of columns in the White List file. From the count selected, you will want to define the length of each. Using a program like Notepad with a Status Bar can help determine the size of each column length. The column lengths must be one or greater (up to 500). If you wish to ignore specific columns, they can be skipped in Select White List Fields.
To load an Example White List File, assign the Column Names to the column data, choose Browse. You will prompted to navigate to the White List file and select. Once selected, you will see a fake path to the file and you can select Next to load it.
Select White List Fields
If correctly defined in Choose the Field Lengths, you will now be displayed a series of Columns that correlate to the fields within the White List file. If the field separation is not correct, ClientPortal can select Back to update the White List field separation. If a header was available, it will displayed at the top of the sample data. To correctly map the fields, ClientPortal will want to select the fields from the drop-down box that pairs with the data seen. After a field is correctly mapped, ClientPortal will select OK to define the next column. Once all the columns have been defined, the template process is complete and Client Portal can select Next to go on to Create White List Update Schedule. If a column is not going to be used, ClientPortal can skip the column and it will ignored when the file is uploaded to Client Portal.
To create a custom column name, ClientPortal selects -New Column Name- to define the column description for the data displayed. You can have up to six custom column names or you can select one of nine default fields to choose from. Once you have used a default column name, it will be removed from the list. You can select -Insert Column Name- in order to push all of the column names to the right that have already been defined. Also, you can select -Delete Column Name- to move all of the column names to the left that have already been defined.
White Plate, State, and Alert are all the required fields. This means, ClientPortal must use the required fields in order to load the file. If ClientPortal does not have a State or Alert field, ClientPortal can define them manually from the following drop-down boxes. Each record in the White List will be assigned the value defined. If the Alert is not available in the drop-down box, a new Alert name can be created.
Create White List Update Schedule
The final step when setting up a scheduled White List is to specify the schedule when the White List will be inserted into ClientPortal. The Use Daily Schedule will update the White List at a specified time each day.
You also have the option to set up for a Time Interval. Select you Time Interval bullet to specify the duration and whether the duration is in Minutes or Hours. This is most commonly used when setting up with a Local connection type.
Lastly, you have the option to set up for a specific Schedule. Select the Customize Schedule bullet and specify the days of the week you wish to load. For each day selected, you must enter at least one time of load. There is the option to select up to two different load times. Likewise, you can select All Weekdays or just Weekends.
Once the schedule has been set, the final thing to do is to select Finish. You will see your Scheduled White List displayed in the Stopped state. Do not forget to highlight the new schedule and select the Start button to begin your Scheduled White List. Upon load, you will be notified via email of the number of records successfully loaded. If you notice that your White Lists are failing to load, please contact Vigilant Support for assistance.
View White List Template
To view White List templates, go to .
Create or Edit White List Template
You are presented with three operations (Create, View, Edit). If you selects Create, they will go through our White List Template Wizard. Once created, you can select View to confirm selection or Edit to modify pre-populated fields.
Assign White List Name and Description
ClientPortal first will want to enter a unique and short name of the Template. A larger description can be added that describes what the template applies to. The Template Name is also the Source Name of the White File. If the Template Name is a duplicate, you will be prompted to enter a different name.
Designate File Headers and Separators
Designate file headers and separators
Examine the White List file for a Header Row. This will be the first row of the White List. Select Yes or No in the dropdown box based on if the White List has a Header Row. Next, ClientPortal must examine if the White List data is separated by a special character or if it is a Fixed Width. The best way to determine if it is Fixed Width is to count the number of characters in a row. If each row is identical in length, it could be Fixed Width. If you find the White List to be Delimiter separated, you will be prompted to select a character.
Choose the Delimiter Type
For Delimiter, you will want to define what the delimiter type is. Examine the file and determine if there are any special characters that separate the data into separate fields. The most common are Comma, Semicolon, and Tab. ClientPortal has added these as defaults. You can also choose your own deliter as well. If no delimiter is found, it can be Fixed Width or a special format.
Choose the Field Lengths
For Fixed Width, you will want to define the field lengths of each column. First, you will choose the number of columns in the White List file. From the count selected, you will want to define the length of each. Using a program like Notepad with a Status Bar can help determine the size of each column length. The column lengths must be one or greater (up to 500).
To load an Example White List File, assign the Column Names to the column data, choose Browse. You will prompted to navigate to the White List file and select. Once selected, you will see a fake path to the file and you can select Next to load it.
Select White List Fields
Select Hot List Fields
If correctly defined in Designate File Headers and Separators, you will now be displayed a series of Columns that correlate to the fields within the Hot List file. If the field separation is not correct, ClientPortal can select Back to update the Hot List field separation. If a header was available, it will displayed at the top of the sample data. To correctly map the fields, ClientPortal will want to select the fields from the drop-down box that pairs with the data seen. After a field is correctly mapped, ClientPortal will select OK to define the next column. Once all the columns have been defined, the template process is complete and ClientPortal can select Finish. If a column is not going to be used, ClientPortal can Skip the column and it will ignored when the file is uploaded to ClientPortal.
Enter a Title for the Custom Fields
When selecting Custom Fields from Select White List Fields, you are given options to include custom Titles for each custom field. You simply need to enter a short description of each Custom field that corresponds to the order selected in Select White List Fields. When done, select Finish and your Hot List Template will save and show up in the Template Library.
Search White List Records
To search for White List records, go to .
You will be presented with Time Period and Filters to narrow down your desired results. You will also be presented with a Dashboard view of the total records listed for each White List Source. Within this dashboard, you will also be presented with the Total White List Records. This is the total Active records associated with all visible White Lists for the site manager that is logged into ClientPortal.
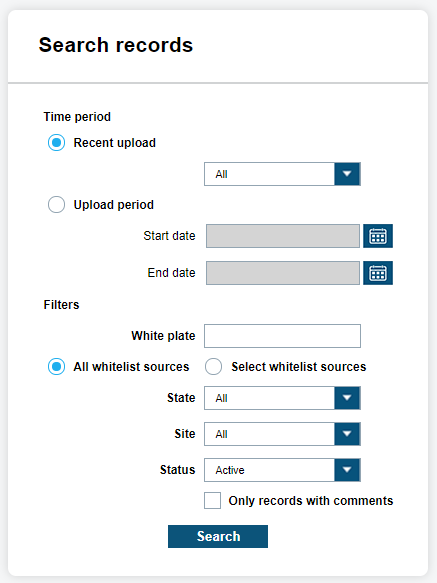
Time Period
Time-Period allows you to choose between Last 24 hours to Last 60 Days to All records for Recent Uploads. Also, you can choose Upload Period to choose Start and End date using the calendar tool.
Filters
The Filters allow you to define a White Plate, White List Source Alert Type(s), State, Site, and Status. When searching for a specific plate that is on a White List, the Hot Plate filter can be used. The White List Source is a dynamically populated option that fills with Sources based on access. You can see the ClientPortal, CDMS Client, or CDFS Client Source names to denote a single Hot Plate loaded.
The Alert Type(s) filter option will dynamically list all Alerts that are found for each Source. When you disable a White List Source, it will automatically update the Alert Type(s) and remove those Alerts. Therefore, you only see the Alerts that are selectable. The State filter is dictated by White List records and can be used for US or Non-US provinces. By selecting the Site filter, you will be able to define whether the Alert came from your Site, a personal White List, or a Shared White List from another Site.
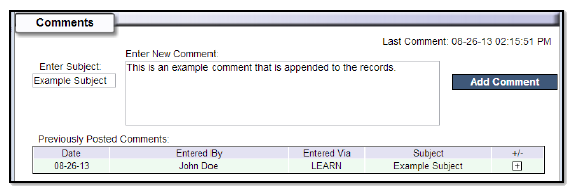
You can also filter by White List Status with the options being Active, Inactive, or All. A White List can become inactive after a period or by selecting the individual White List and making it inactive. Lastly, ClientPortal has the option to only show White List records with comments. When viewing a White List, you can attach a personal comment to the record as seen below.
Search Results
Once all the Filters and Time Period have been selected, you will select Search to start the query. You will presented with each White List record in chronological order. The default table view will include Hot Plate, State, Alert, Order Date, and Source name. Source will show the letter “(S)” next to the name if it is a White List that is being shared with your Site. You can select Edit only if the White List belongs to your site. Premiere White Lists are also uneditable to keep the integrity of the White List intact.
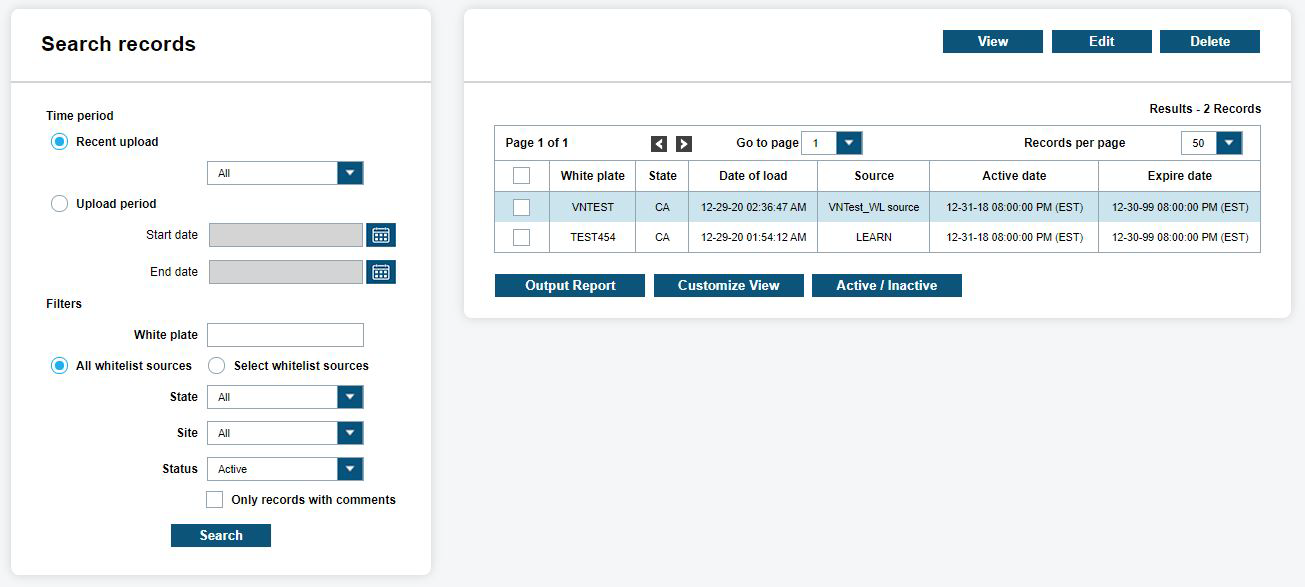
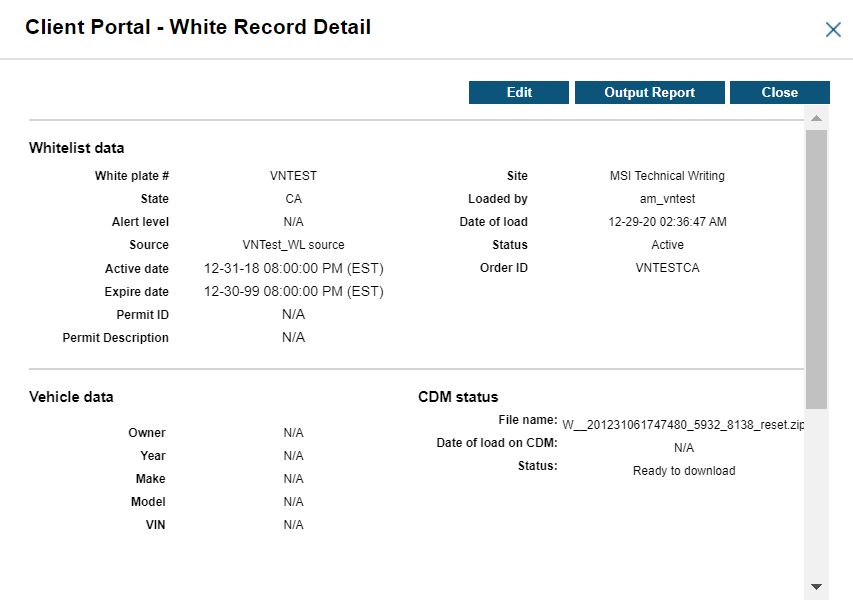
You can highlight a record and click View to view the Hot Record details within a pop-up display. All the White List Data fields in the table will be listed, and including Site, Loaded By, Date of Load, Status, and Order ID. Further Vehicle Data can be entered based on the Template. This can include Owner, Year, Make, Model, VIN, or it can include custom fields such as Name, Address, and Description.
In the CDM Status detail, the Status field will show when the White List plate record is ready to be downloaded to Car Detector Mobile systems.
If you scroll to the bottom for Comments, you can append White List comments to the bottom of the record. These comments can include descriptions that are not included on the original White List record. Enter the Subject and New Comment and click Add Comment. Each comment will appear below the White List records in minimized form. You can select + to expand comments. From the Hot Record Detail, you can also select Output Report to generate report or Close to close the window.
Locations
To search for White List records, go to .
White List Locations are geo-zoned areas that correspond to White Lists of authorized vehicles. These locations are distributed to the LPR clients and systems, along with the corresponding White Lists. When the LPR mobile system enters a new geo-zoned location, it will activate the White List for that location. This tool allows the creation and assignment of locations for this purpose.
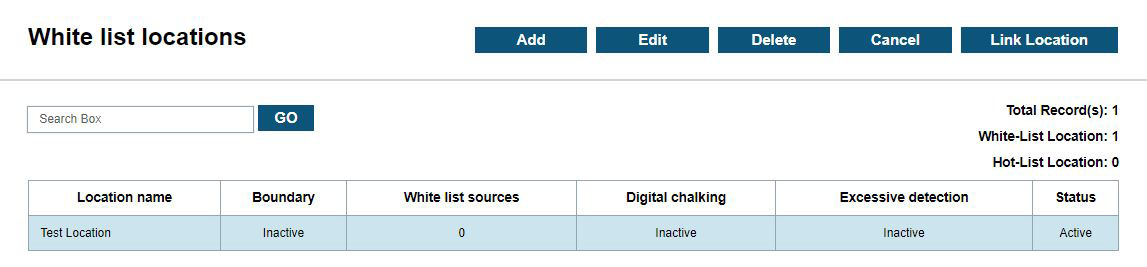
Managers can set up locations after loading a White List by choosing Add and then enter the Name of the location.
The location boundaries can be defined in one of the two ways:
- By address with the Manual Zone check box.
- By Geo Zone with the Geo Zone check box.
When Manual Zone is selected, the address entered into the Address field is used to manually specify which White List is loaded based on the location. This option is useful for Car Detector Mobile systems that operate in locations with spotty GPS service like parking garages.
When Geo Zone is selected, a user drawn boundary is used to automatically determine the correct White List to load based on a Car Detector Mobile system's GPS location.
When drawing a Geo Zone. enter an address into the Search box to zoom to a general location. Then, use the tools in the upper right corner of the map to draw the Geo Zone.
Managers will also have the option to define the enforcement period. Thus, if a zone is only enforceable between a specific period, the client will not alert outside that period. Also, this allows for multiple White Lists to be assigned to same location. Thus, if a permitted vehicle can be allowed to park during the day, but not at night; and vice versa. Lastly, the manager will want to assign the White List associated with the zone by highlight desired White List and choosing Add under White List Assignment. Choose Save and the location will be automatically distributed to client.
Managers are also able to choose Edit and Delete to alter White List locations. If a manager chooses to edit a location, they are able to change the Enforcement Hours and White List Assignment. To remove a White List assignment, highlight the undesired list and select Remove button.
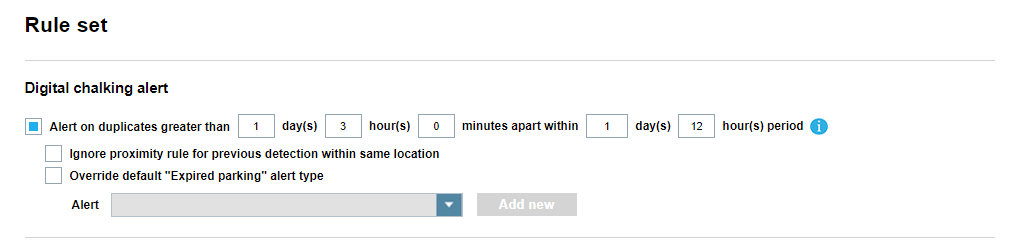
Digital Chalking
Managers are also able to choose Digital Chalking Alert to generate new locations. A digital chalking alert is a function where storee vehicles that have been scanned within a given period and location. If a vehicle has been scanned multiple times within a defined period, the LPR system will alert you. Likewise, ClientPortal, will display the unauthorized vehicle. You can also apply both White List and digital chalking at a single location.
To apply the digital chalking rule-set, we will want to select the Digital Chalking Alert check box and choose the period allotted in hours and minutes. Lastly, we will want to define the period in which we will let plates fall off list to prevent the case of vehicles exiting and re-entering location in subsequent days or periods.
For example, you can load a White List of employees’ permitted plates and assign to location. Also, we can apply a digital chalking rule-set to same location to notify users if vehicles remain at the location beyond a given period.
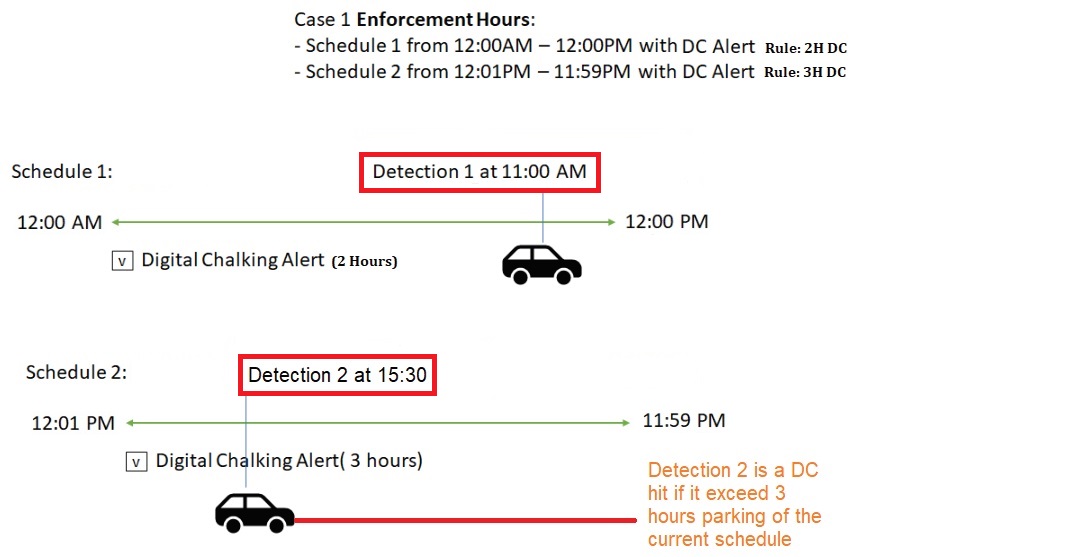
Digital Chalking also supports the use of multiple schedules. A Schedule is a set of Enforcement Hours that can have a unique rule-set (Digital Chalking Alert, Excessive Detection Monitoring, or Fixed Camera Options) applied.
For Digital Chalking, multiple detections of the same vehicle across different schedules will correctly generate Digital Chalking Alerts based on the rule set for the active schedule. This means that if a detection is made during one enforcement hours of the Schedule #1, and the next detection of the same vehicle is during one enforcement hours of the Schedule #2, the second detection will only trigger a Digital Chalking Alert for that vehicle based on the rule set of the Schedule #2.
See the following diagram for an example.
Fixed Camera Options
Agency Managers can use the Fixed Camera Options section to select White List, digital chalking, or occupancy options for fixed camera systems.
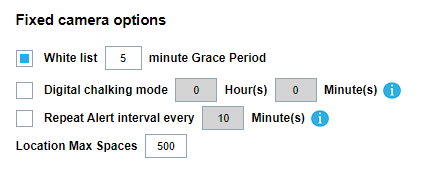
For Location Max Spaces, you can assign the total number of spaces available within a surface lot or garage that is configured with the Fixed LPR camera system. The main benefit of this functionality is that you can then check all of the occupancy data from fixed cameras from the Operation Overview screen, allowing manual correction of the occupancy totals with the Adjust button. The occupancy can also be viewed and adjusted in the mini-dashboard feature of the Density Map screen.
IP Displays is a third-party parking Integration option that can be enabled for sites by Vigilant ClientPortal administrators. The IP Displays feature pushes occupancy for specific locations to digital signs in near-real-time. When enabled, the Send occupancy data to this address check box will appear in the Fixed Camera Options section. Here, you can enter the IP address of a digital sign using IP Display API for populating occupancy information about a parking Location.
INSERT THE REFERENCED SCREENSHOTS FROM CLIENT PORTAL 6.0: CLIENT PORTAL 5.2.171 UPDATE (FIGURE 1) CLIENT PORTAL 5.2.171 UPDATE (FIGURE 2)
The Repeat Alert interval every … minutes check box allows you to enable persistent Alerts. When Alerts are enabled on White Lists and Digital Chalking hits, email and TAS alerts will be sent repeatedly at the configurable interval if vehicle is still in violation.
The White List Mode Grace Period check box will configure Vigilant ClientPortal to send an alert if a vehicle has not been added to a White List after a specified amount of time upon entering a location. When a driver enters a location with a White List and a grace period is set up, Vigilant ClientPortal will alert if they fail to be added to a White List before the grace period expiring. An alert will also be sent if the parker is still occupying the location and the vehicle has not exited the location when the White List has also expired.