User Management
Add New User
To add a new user, go to
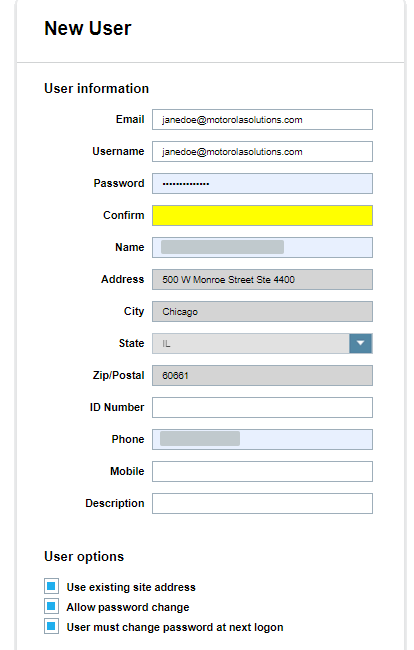
When you create a new user, you will be required to enter all the required fields (Username, Password, Name, Address, City, State, Zip, Phone, and Email). You can add more user information as desired (Badge, Mobile, and Description). You can prepopulate the user address with the site address by selecting the Use Existing Site Address option. A site manager can also allow the right for the user to change their password underneath their My Profile section by checking Allow Password Change. You can control your own alert management for emails and Target Alert Service (TAS).
Profile Name
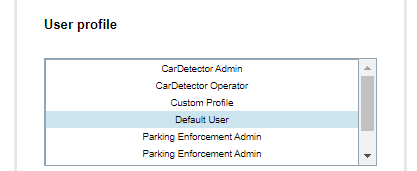
The Profile Name allows the selection of Default user Profiles or Predefined user profiles. By selecting one of the profile names, the user permissions will become prepopulated with the selection. The site manager then has the option to Create/Save the user, or they can alter the prepopulated user permissions. If the site manager elects to change the prepopulated user permissions, the User Profile will not be used and instead becomes a Custom user Profile. You can reset the permissions to a User Profile by selecting a profile name from the table.
LPR System Use
If you will be using a License Plate Recognition (LPR) system, Client Portal can set the LPR system use. The site manager can choose between CarDetector Admin, CarDetector Operator, CDFS (CarDetector Fixed system) Admin, CDFS Operator, CDMS (CarDetector Mobile system) Admin, and CDMS Operator.
A CarDetector Admin can operate either Vigilant CarDetector Fixed or Vigilant CarDetector Mobile. An admin user can alter the system Settings and Configurations.
A CarDetector Operator is limited to what configuration options are available based upon which system Type they are using. The purpose of having two separate users is to prevent the systems from being misconfigured or un-calibrated.
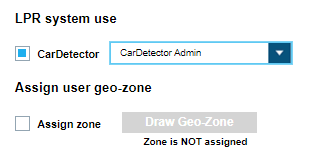
Assign User Geo-Zone
The Site managers can assign a user Geo-Zone to a specific user by selecting the Assign Zone box and creating a polygonal zone. This will limit what detections can be seen by the user within ClientPortal. An example case scenario is when a user is assigned a Precinct or District and you do not desire site-wide hit notices are not desired outside their Precinct. This is not required is if no geographic restrictions are desired at the user level.
Console Access
The site manager can also set Console Access settings that will be applied to you when they log in to ClientPortal.
The Dashboards utility allows for the Viewing and Scheduled Reporting of system statistics. By selecting the Dashboards box, you will have the ability to print off statistical reports or receive through email. The following Dashboard statistics can be viewed: hit counts, Hot List counts by Source, Hot List counts by alert, detection counts. The statistics can be sorted by site and/or user. Please review the Dashboard section within this Guide for more information.
Before a user can print off or export reports from ClientPortal, they must be given the Reporting feature. The Reporting option allows for the export of weekly Dashboard reports, detection views, hit-List Views, Hot List Views, Mapping Views, and other reporting options. This only applies to ClientPortal and will not affect the Client Reporting options. The purpose of disabling would be to prevent the export of data in a Reporting format. Nearly all users make use of this feature, as the reporting features is one the largest uses of ClientPortal.
The site manager can set a users auditing level and there are three levels of Auditing for users (silent Auditing, Allow Audit Detail and Require Input). With Silent Audit, every query or search a user attempts, a record of their IP address, date time, and info of their query will be stored. At this level, a notice will not be displayed with the option to enter more information. With Allow Audit Detail, you have the option to enter Audit information but is not required. With Require Input you receives the same pop-up, and must input their Name, Case Number, and the Reason for the transaction.
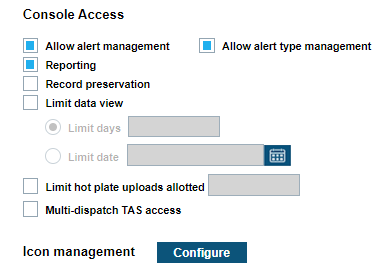
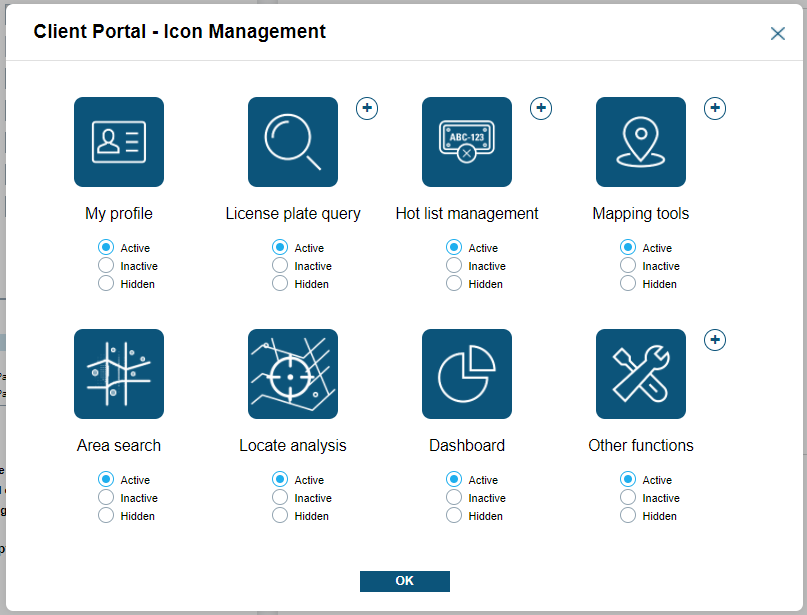
Icon Management allows site managers to turn on, hide, or disable specific icons and features. If an icon is disabled, you will see a grayed out icon. If the icon is hidden, you cannot see the icon within their home screen of ClientPortal when they login.
User Permissions on Detections
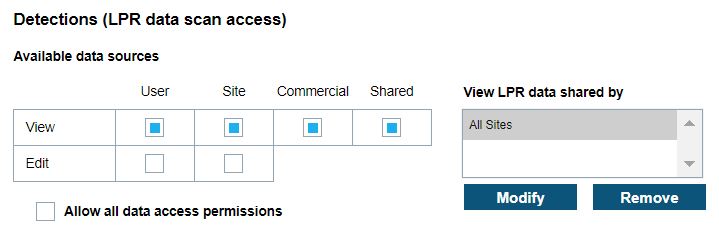
Site managers are able to set the Detections (LPR data scan access) and limit the view of detections available.
Detections are broken into different groupings based on access level or data 'pools'. There is a 'User' pool, a 'Site' pool, a 'Commercial Data' pool, and a 'Shared' pool. All users can see and edit their own detections (User Pool) and the scans of other users within their site (Site Pool). This ability can be limited by unchecking the boxes under 'User' or 'Site' in the 'View' row, respectively.
Commonly, the ability of users to 'Edit' their own (User Pool) scans or site (Site pool) scans is disabled by unchecking those options in the 'Edit' row. Checking the 'Commercial' option allows this user to view license plate detections from other ClientPortal sites and accounts.
As described above, Sites can Share data with other Sites (see ‘Detection Site Sharing’). Once a Site has shared their Detection data, each user will need to be setup to receive this data within their user Permissions. The site manager can Modify (Add) individual Sites or all Sites. Likewise, they can be removed as needed.
User Permissions on Hits
Site managers are able to set the hits (Hot List – Detection matches) and limit the View of hits available.
A hit occours when a license plate detection is made that is also listed on a Hot-List. The ability of a user to view or to be alerted by hits can be limited based on User, Site, and Shared data pools.
There are a total of three alert types available: TAS (Target Alert system), E-mail, and Mobile hit-Hunter. These three alerts can be turned on and off for a user Hot List, a Site Hot List, or a Shared Hot List. When selecting Shared data, best practices dictate that the Site Manager select from the list of available sharing sites.
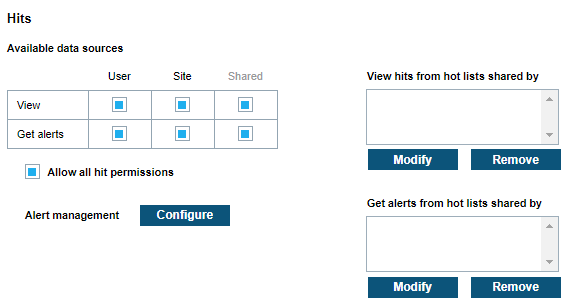
You can configure their Alert Management options if allowed by the site manager. Likewise, site managers can set the Alert Management by selecting Configure. There are two main alerts allowed through Alert Management which consist of Email Service and Target Alert Service (TAS). A fourth alerting feature, Mobile Hit Hunter (MHH) can also be configured when applicable for the Mobile LPR Camera system.
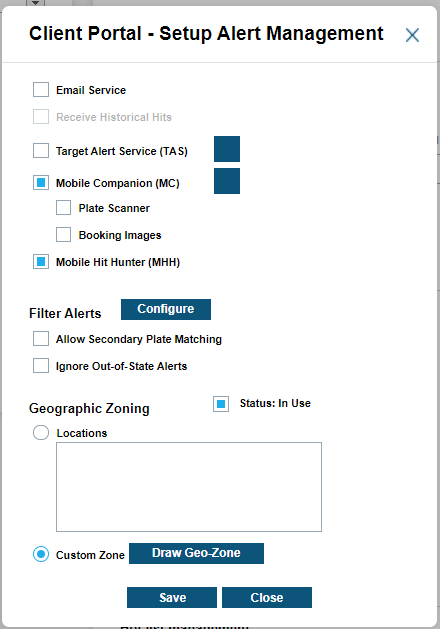
When configuring Email Service, you have the option to receive Historical hit alerts. These alerts are when a Hot List is loaded after a scan has been made and the option is selected to create historical hits on Hot List load.
Target Alert Service allows you to instantly receive alerts at their terminal, simliar to the alert screen of Vigilant CarDetector. This tool allows for fast response to alerts in a realtime alerting environment. There is an option to download this tool and connect to the ClientPortal Server with it. See Software Downloads for more information. Mobile Hit Hunter (MHH) allows the consumption of Contributed Data within Mobile LPR camera system. Client Portal has ability to turn on/off alerts for MHH as needed through the Filter Alerts section.
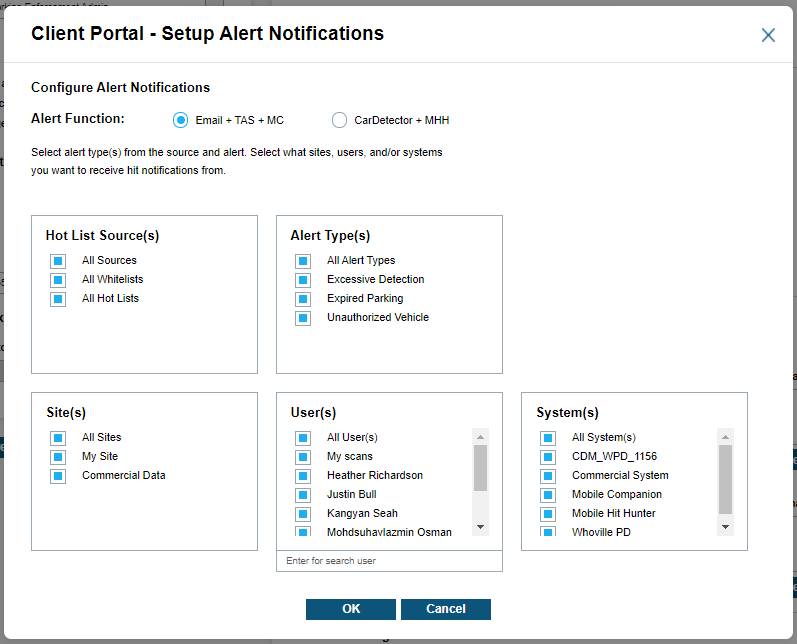
The Filter Alerts section allows you to configure individual alerts based on Hot List Source, Alert Type, Site, Users, and/or Systems when allowed by the site manager. You can disable these options to discontinue hit notifications for the services that you have selected (Email, TAS, and MHH). This prevents unwanted notifications and allows you to filter the alerts according to the preferences.
Within the Filter Alerts section, the user also have the option to Allow Secondary Plate Matching. This feature allows for the alerting on secondary OCR reads from the LPR camera systems. Since ClientPortal store two reads for each scan if the confidence of the first read is low, this allows for increased alerting on hard to read plates. Note: when selected, you will see an increase of False Positives and inaccurate reads (default is unselected). There is also the option to Ignore Out-of-State Alerts as it pertains to the Hot List. Each Hot List consists of a State ID that is abbreviated to two characters. If the GPS location of the scan is outside the State ID listed in the Hot List, you will not be notified.
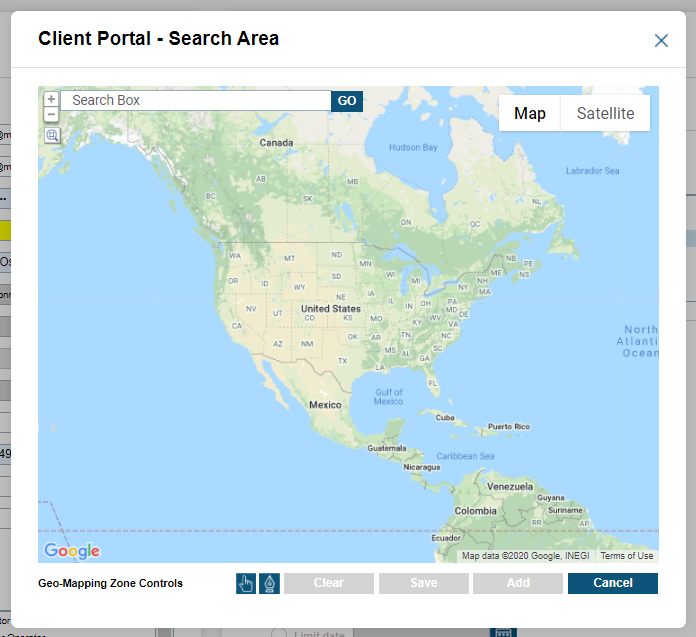
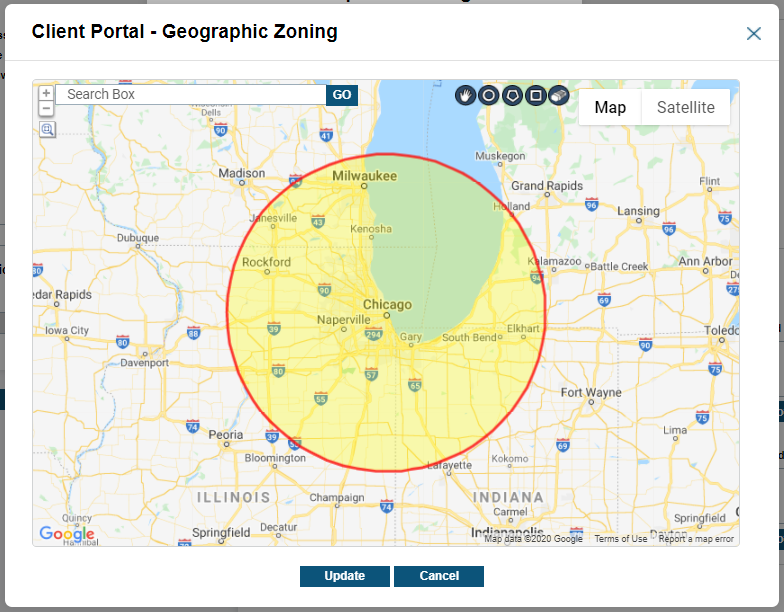
Geographic Zoning allows you to define the exact perimeter that they will be notified for. To use the polygon drawing tool, use the Google Map zooming tools in upper left corner to zoom-in on region to select. Next, select the Polygon icon in lower left corner to begin polygon creation. Generate polygon selection by Left-clicking on the map with at least three points. To reset the zone, click Clear, and draw again. You can add multiple zones by clicking Add. Click Save to save the zone and click Update.
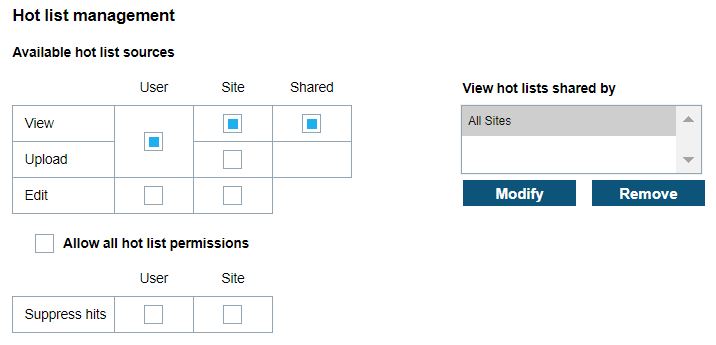
User Permissions on Hot Lists
Site managers can set the Hot List Management and limit the view and ability to upload to each user.
Hot-Lists are a special case of data pool in that they are created by Users or Site Managers instead of detected by a LPR camera system. Site Managers can allow users access to view or add data to a Hot-List 'pool' based on the source - their own (User Pool), or by their site (Site Pool).
Site Managers can also give access to Hot-Lists that have been shared by other sites. If access to shared hot-lists is selected, best practices dictate that the Site Manager also select from the list of available sharing sites. Users are only able to Edit hot-lists within the User and Site data pools. Shard hot-lists cannot be edited.
User Permissions on White List
Site managers can set the White List Management and limit the view and ability to upload to each user.
White-lists are another special case of data pool, operating as the inverse of a hot-list; alerts are sent or action is taken when a detection is made that is NOT included on a white-list. Like hot-lists, Site Managers can allow users to access to view or add data to a white-list pool based on the source - their own (User Pool) or by their site (Site Pool).
Site Managers can also give access to white-lists that have been shared by other sites. If access to shared white-lists is selected, best practices dictate that the Site Manager also select from the list of available sharing sites. Users are only able to Edit white-lists within the User and Site data pools. Shard white-lists cannot be edited.
Search and Modify User
To search and modify user, go to
To search and modify users, ClientPortal has dropdown boxes to select the specific user. If you have multiple users, you can search by Name or Email address.

Within the table, you will see the Name, Profile, Email, and Status of the available users. To edit the user, simply highlight the desired user and select Edit. You will be presented with prepopulated user permissions. Once the updates have been made to the user Profile, you will need to select Update. If you highlight a user and select View, you will be presented with their contact information. You can also Output Report to create a report of individual user Profiles in a PDF format.
To make a user Inactivate, simply highlight the desired user and select Active/Inactive. This will make the users unable to log in to ClientPortal or any Client. They will be notified that their account is inactive and to contact their site manager upon attempting to log in to Client Portal. ClientPortal has included a feature to copy the user permissions automatically into a new user Profile of an existing user. To create a copy of a user, simply highlight the desired user, and click Save As New. You will be prompted to insert the Username, Password, Name, and Email. It will prepopulate the Address and Phone of the copied user. Lastly, you can select Allow Password Change to allow the user to change their password within their Profile. To generate the new user, select Save, or select Cancel to quit user creation.
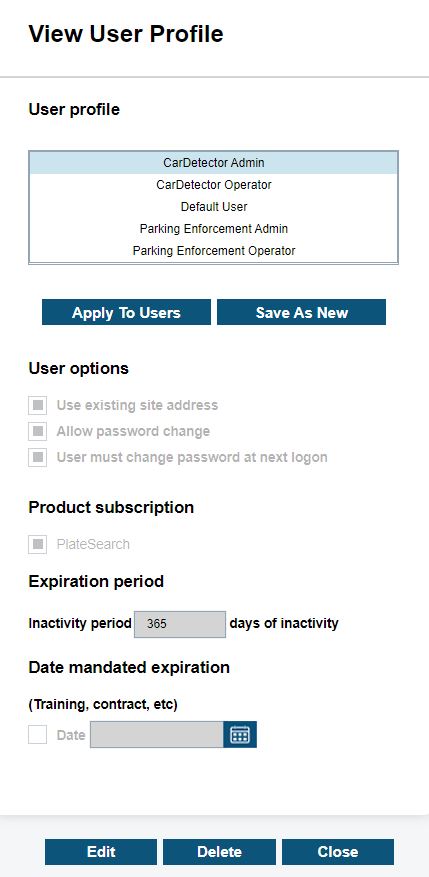
User Profiles
The View Profiles option allows site managers to view available user profiles and how they are applied to various users. The site manager can browse through the User Permissions for each Profile Name by selecting them in the table.
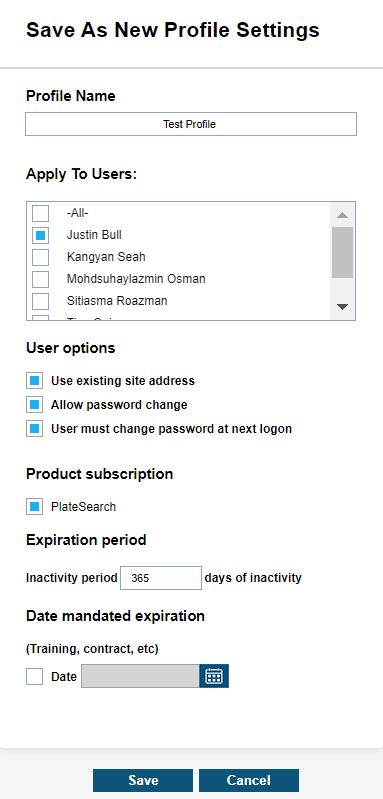
The permissions will prepopulate the page in a noneditable view. Once the desired user profile is selected, the site manager can select Apply To Users or Save As New. This will bring up the Edit Profile Settings page where user Profiles can be applied to list of users or edited as a new user Profile Template.
Edit Profile Settings
If Apply to users is selected, the user Permissions and Profile Name will not be editable, but can be assigned to a user list in the users table. Once the desired users have been selected, you can select Save to apply profile to users selected, or Cancel to dismiss changes.
If the Save as New option is selected, the User Permissions and Profile Name will become editable, and be User Permissions will be prepopulated with the Profile that was highlighted when selecting the option. The site manager can then alter any permission they desire and apply them to desired users by selected the users in the Apply to users table. Once the desired users have been selected, you can select Save to apply profile to users selected, or Cancel to dismiss changes and go back to previous screen.